
Welcome to Simply Maggie! I just wanted to share some exciting news! I’m opening my own bohemian clothing boutique, Narraboutique.com I am so excited. It opens New Years Day, Jan. 1st 2022 at noon eastern time. I hope you’ll take a peek and see if anything catches your eye. Limited quantities! 10% of all profits will be donated to the Crohn’s and Colitis foundation. Check out my instagram for more updates! @narra_boutique.
See you there!
Now back to the real reason you’re here…
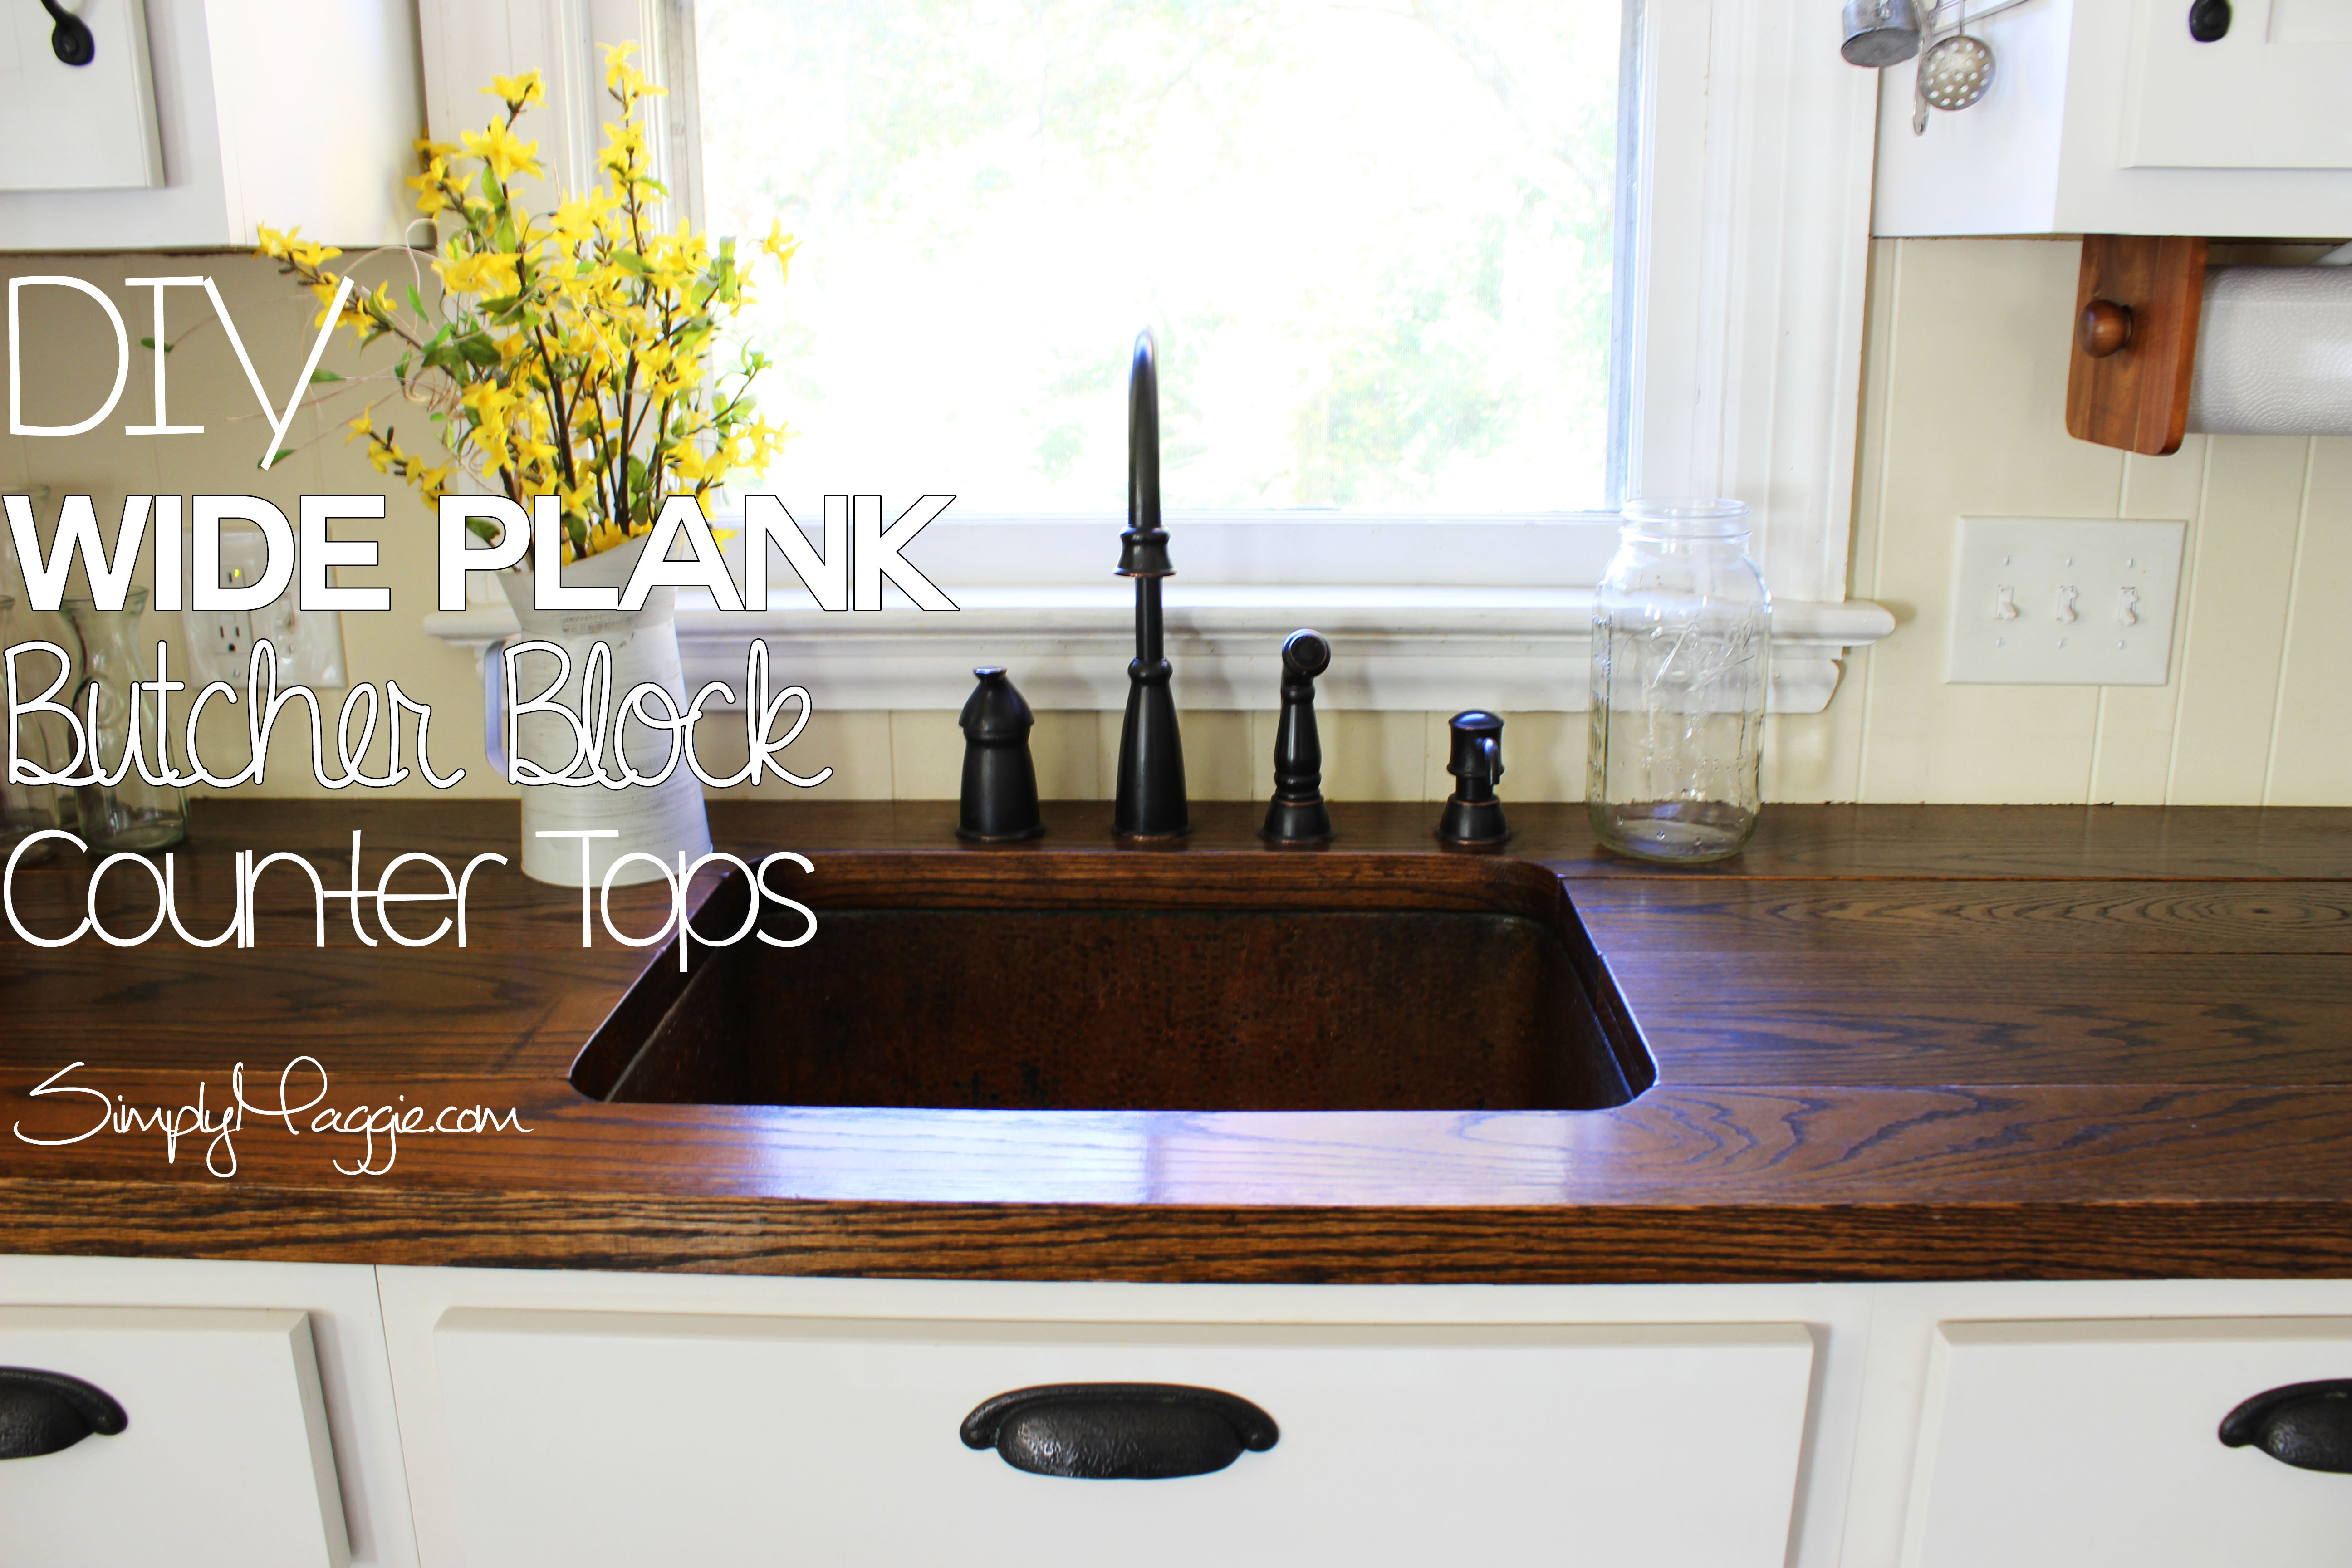
We spent around $500.00 on our counters and compared to spending $4000.00 at Home Depot or Lowe’s I’d say that’s a steal! We also looked into Ikea butcher block counters, but when we thought of the wide plank style we came up with the idea of making them ourselves.
Tools and materials you’ll need:
- Nail gun or hammer and nails
- Palm sander or just sand paper (rough and smooth sand paper)
- Screw gun
- 2 Paint brushes for stain and poly
- Circular saw or a Table saw and Miter saw
- Jig saw or Hole saw
- Tape measure
- A Square or a straight edge
- A box of 1/2″ wood screws
- 1 1/4″ screws or nails
- Angle brackets
- Wood glue
- Polyurethane
- Wood stain (optional) we used Dark Walnut
- We used 8″x 1″ and 6″x 1″ Red Oak boards
- 2″x 3/4″ Red oak trim pieces
- 3/4″ Plywood
- Sand-able and stain-able wood putty
- Clamps
- Saw Horses
I know it’s a long list, but these counters will last you a long time and they look like expensive counter tops and you’ll be glad you bought all the right tools and materials when all said and done!
Start by measuring your cabinets that the counter will be sitting on and cut the plywood with a 3/4″ overhang on the front. Use the same measurements for the oak except add on 1 1/2″ on the sides for your counter top overhang, now cut the oak boards to those measurements.
We used two different widths of red oak boards for variety. Some of them we even ripped down to 7″ wide to fit better. This all depends on personal preference and cabinet depth.
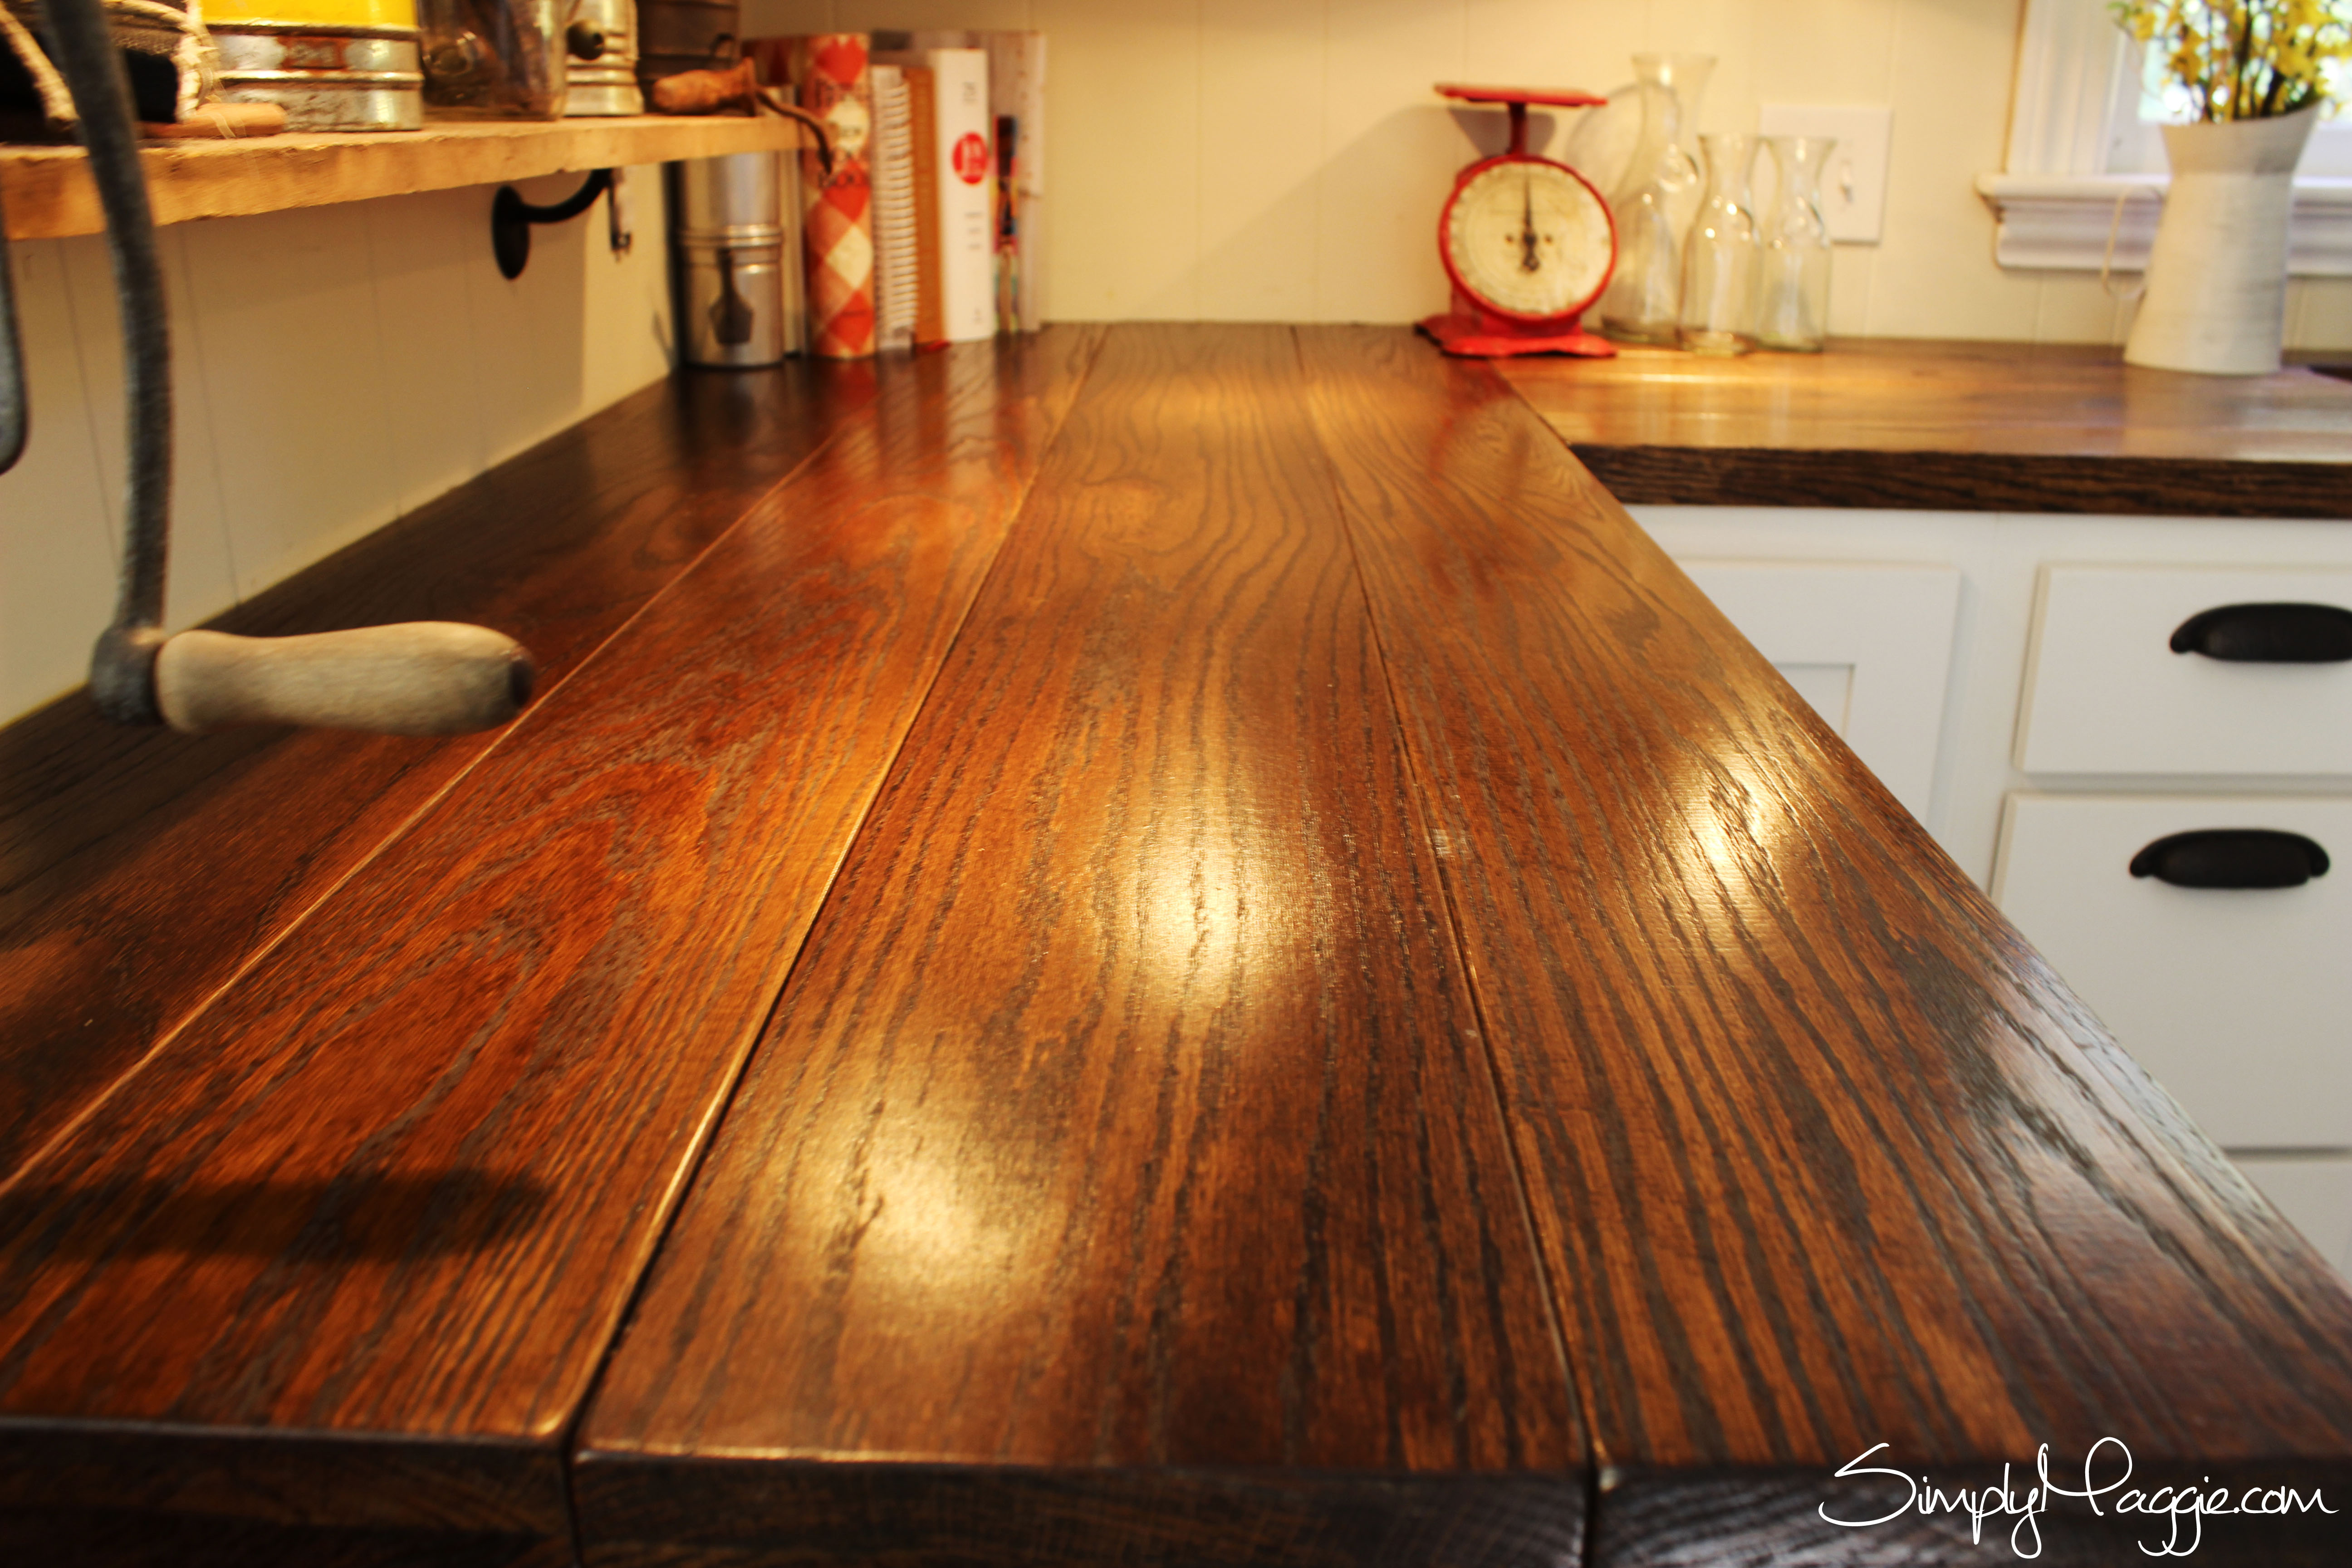
Once you have all your boards cut to size you can sand the corners and edges like we did to add that worn plank look. (this is optional) Make sure not to sand the front corners and edge of that front board since you will be attaching the trim to the front and you want it to be as flush as possible! Sand with rough and then smooth sand paper
This step was pretty time consuming, but for us was well worth the added character.
Glue and clamp the oak boards to the plywood. Then nail or screw the boards together from the underside (with the 1 1/4″ nails or screws) for fewer visible holes.
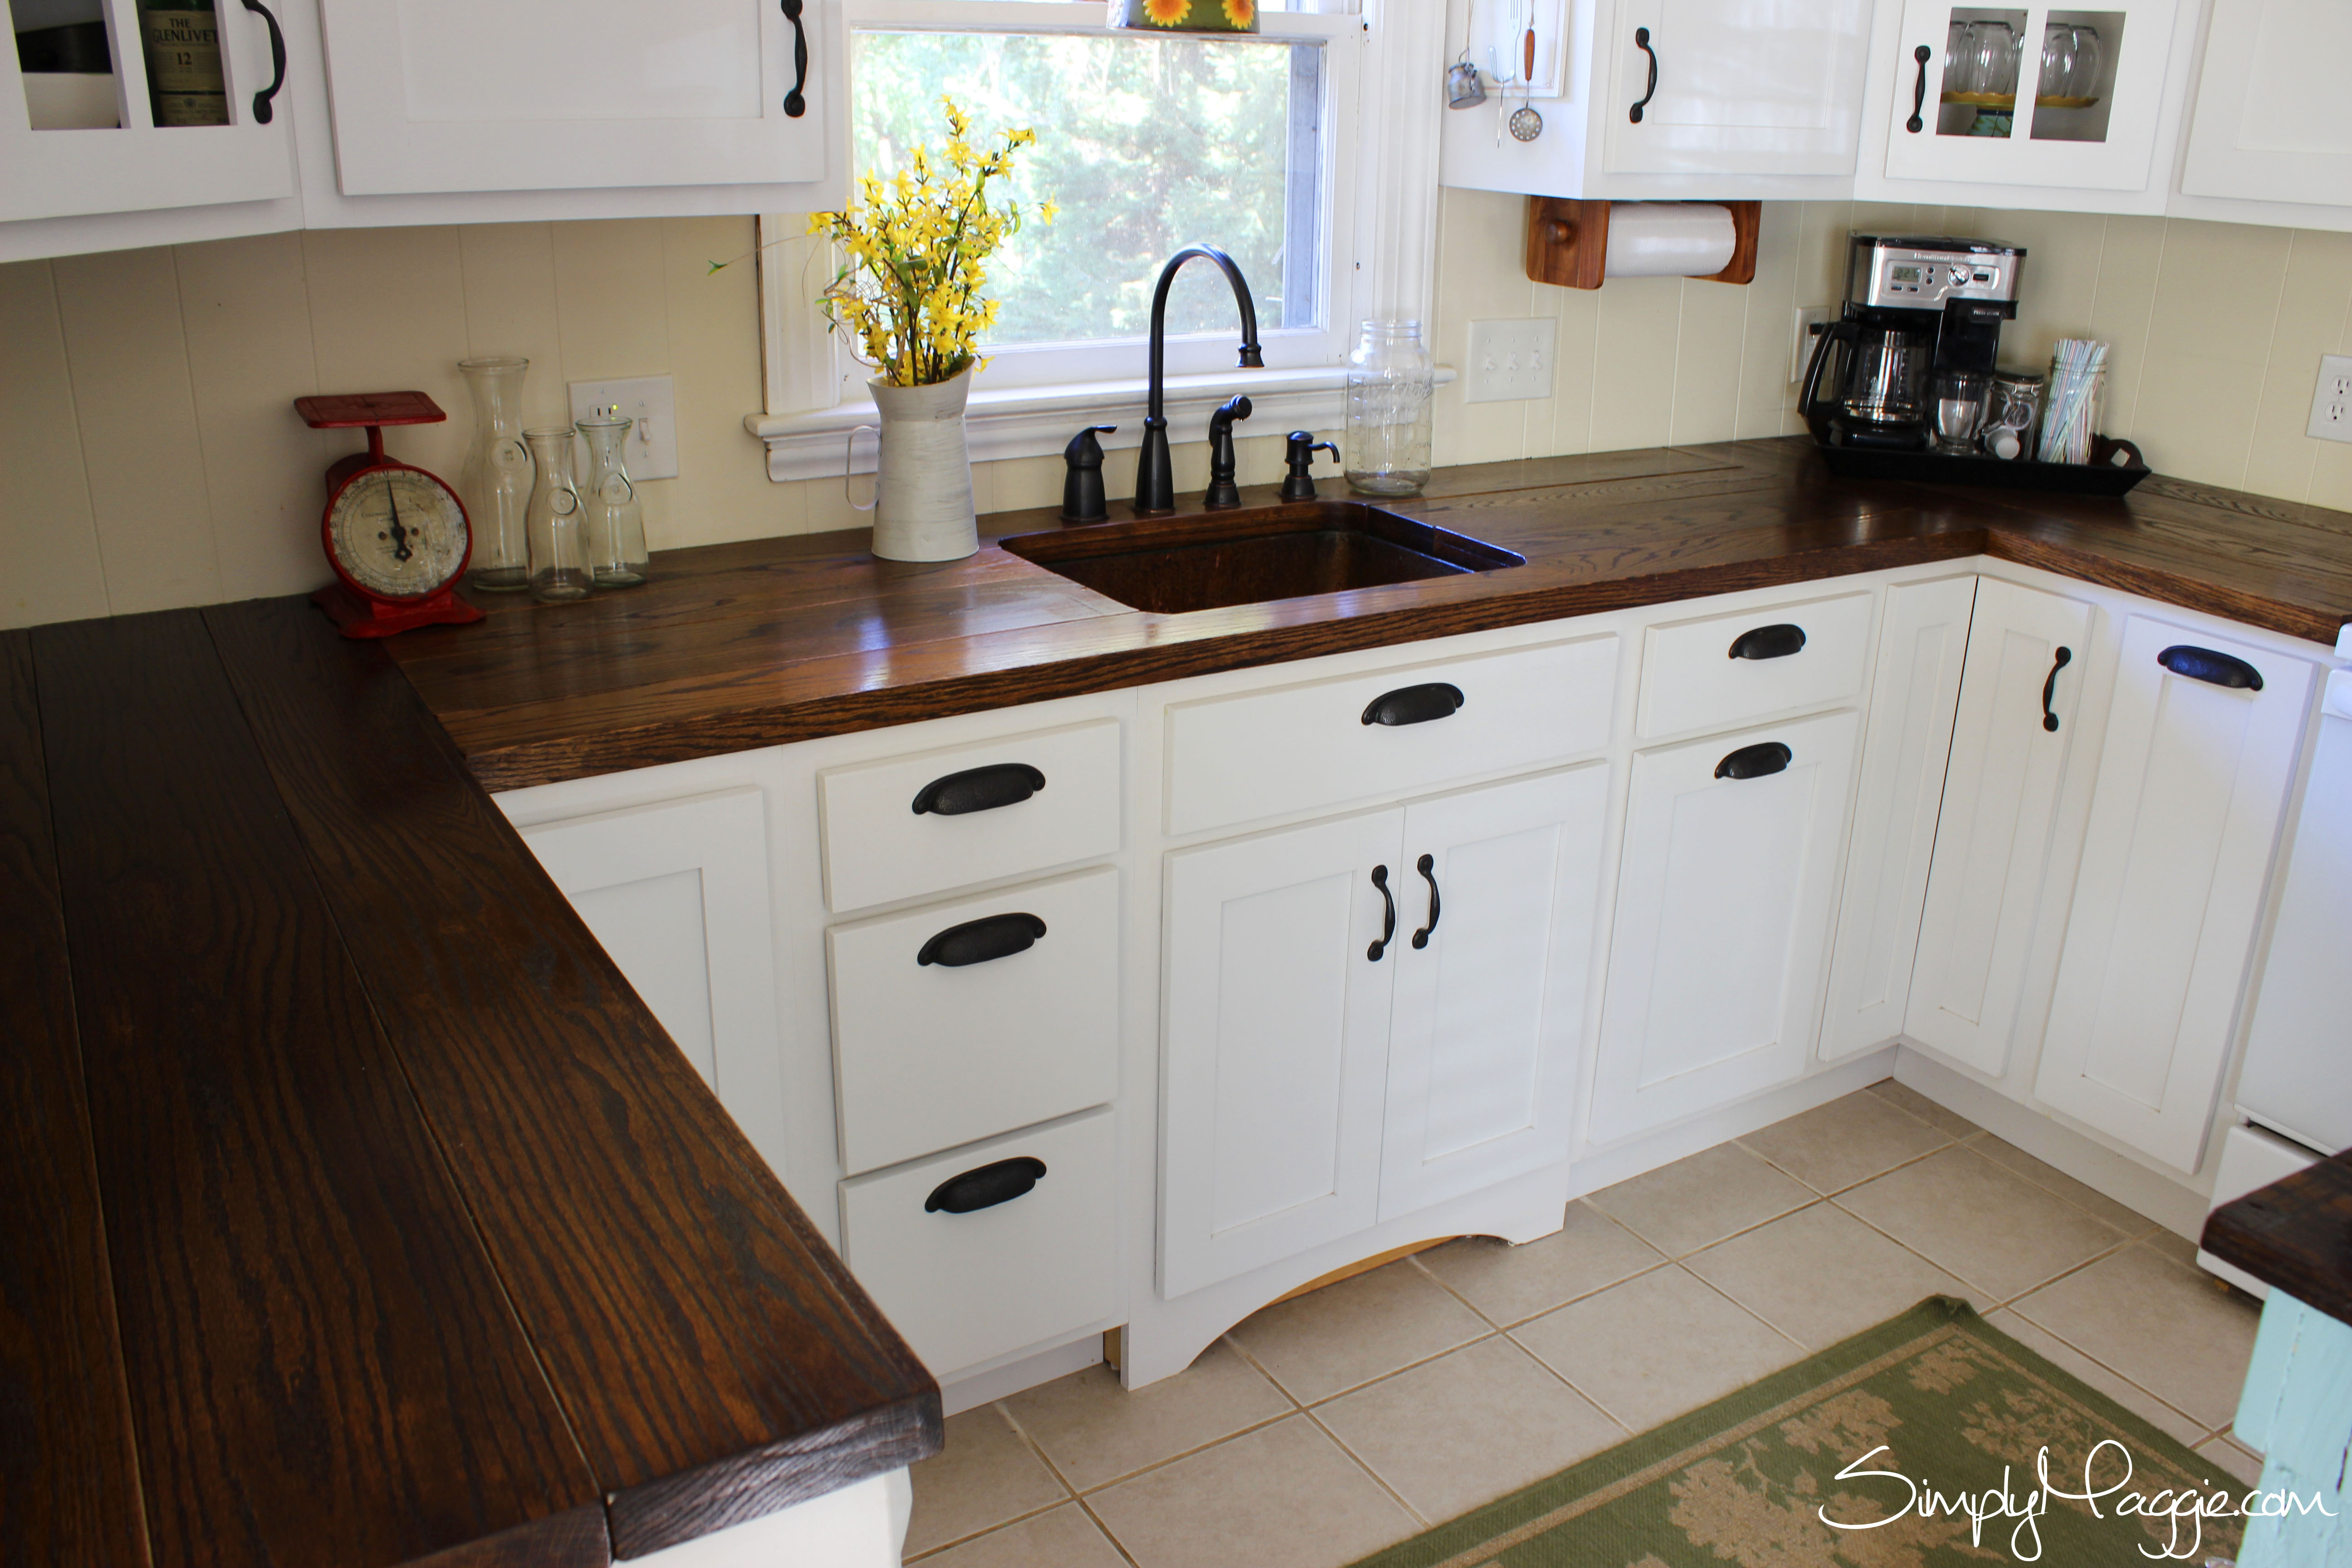
Now what we did to make the boards appear thick like butcher block is to attach the 3/4″ trim to the front of the counter tops. Flush on the top. On the sides we doubled up the oak where the plywood ends underneath.
*TIP* try to match up the wood grain as much as possible with the oak boards and the 3/4″ trim.
Cut and nail the trim to the front of the counters making the top as flush as you can.
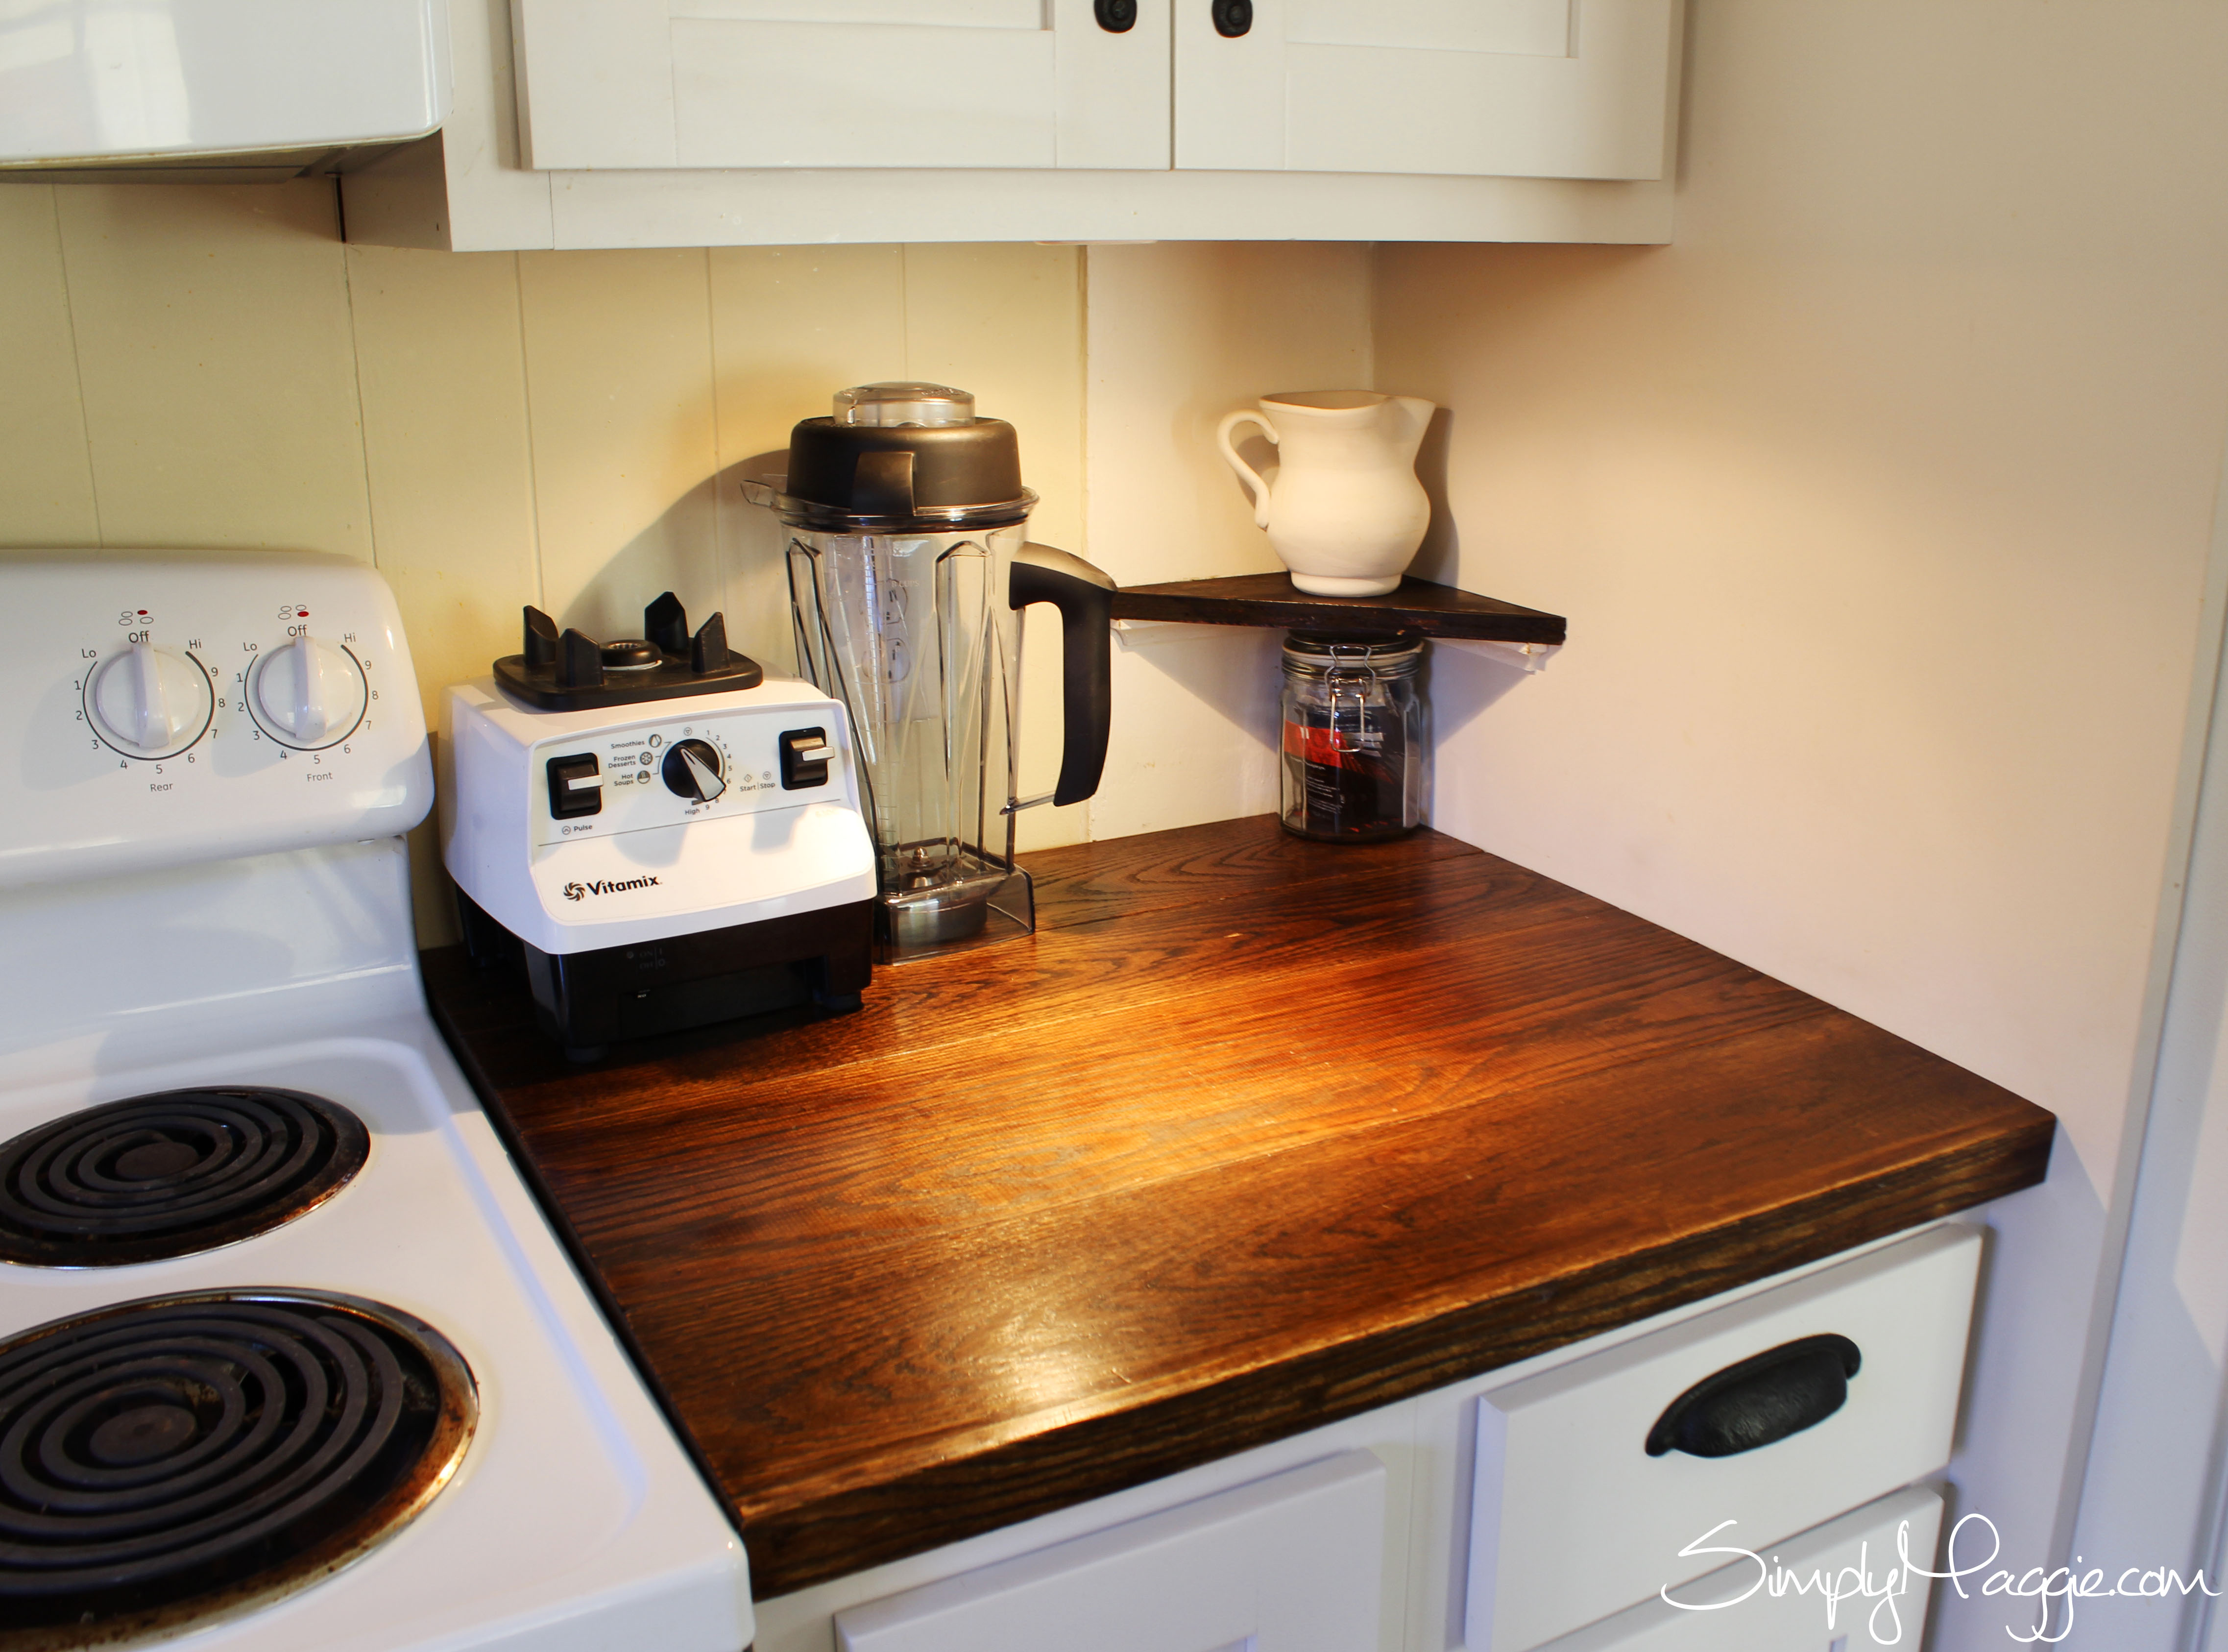
*This already has stain and two coats of poly applied*
The front trim also makes your counter top have the correct size overhang.
Once your counters are all assembled it’s time to patch the nail holes, then sand and stain!
Start by sanding the counters with rough and then smooth sand paper.
Then apply your stain if you choose to stain them. If you like the light look then feel free to skip the staining step. We applied two coats of dark walnut wood stain. Follow the instructions on the back of the can.
Once the stain is completely dry it’s time to poly. Read the instructions on the poly can. We applied one coat with paint brushes making sure the bubbles disappeared as we went along and once that coat was dry we sanded with smooth sand paper. Then we dusted the counters and added a second coat of poly.
Let dry in a non humid, non dusty place.
We then attached the counters to the cabinets with angled brackets from underneath the counters.

UNDER-MOUNT SINK:
We decided to make our sink under-mount. This is personal preference. If you decide not to do this then simply cut your hole for your sink with a jigsaw and put your sink in place. Silicone around the edges for a water tight edge.
If you do choose to do the under-mount then you’ll want to keep the plywood back a couple of inches and double up on the oak where your sink will be. That way you won’t see plywood around the inside edge of the counter tops.
Once you have your oak doubled up, create a template to use when you cut the hole. Get out your hole saw that has the same diameter as the corner of your sink and cut out the corners with this and cut the rest with a jig saw or saw of your choice.
If you are really good with a jigsaw feel free to use that on the edges instead of the hole saw.
Now sand with rough and then smooth sand paper until the corners and edges are all smooth and evened out. This was a very time consuming task for me.
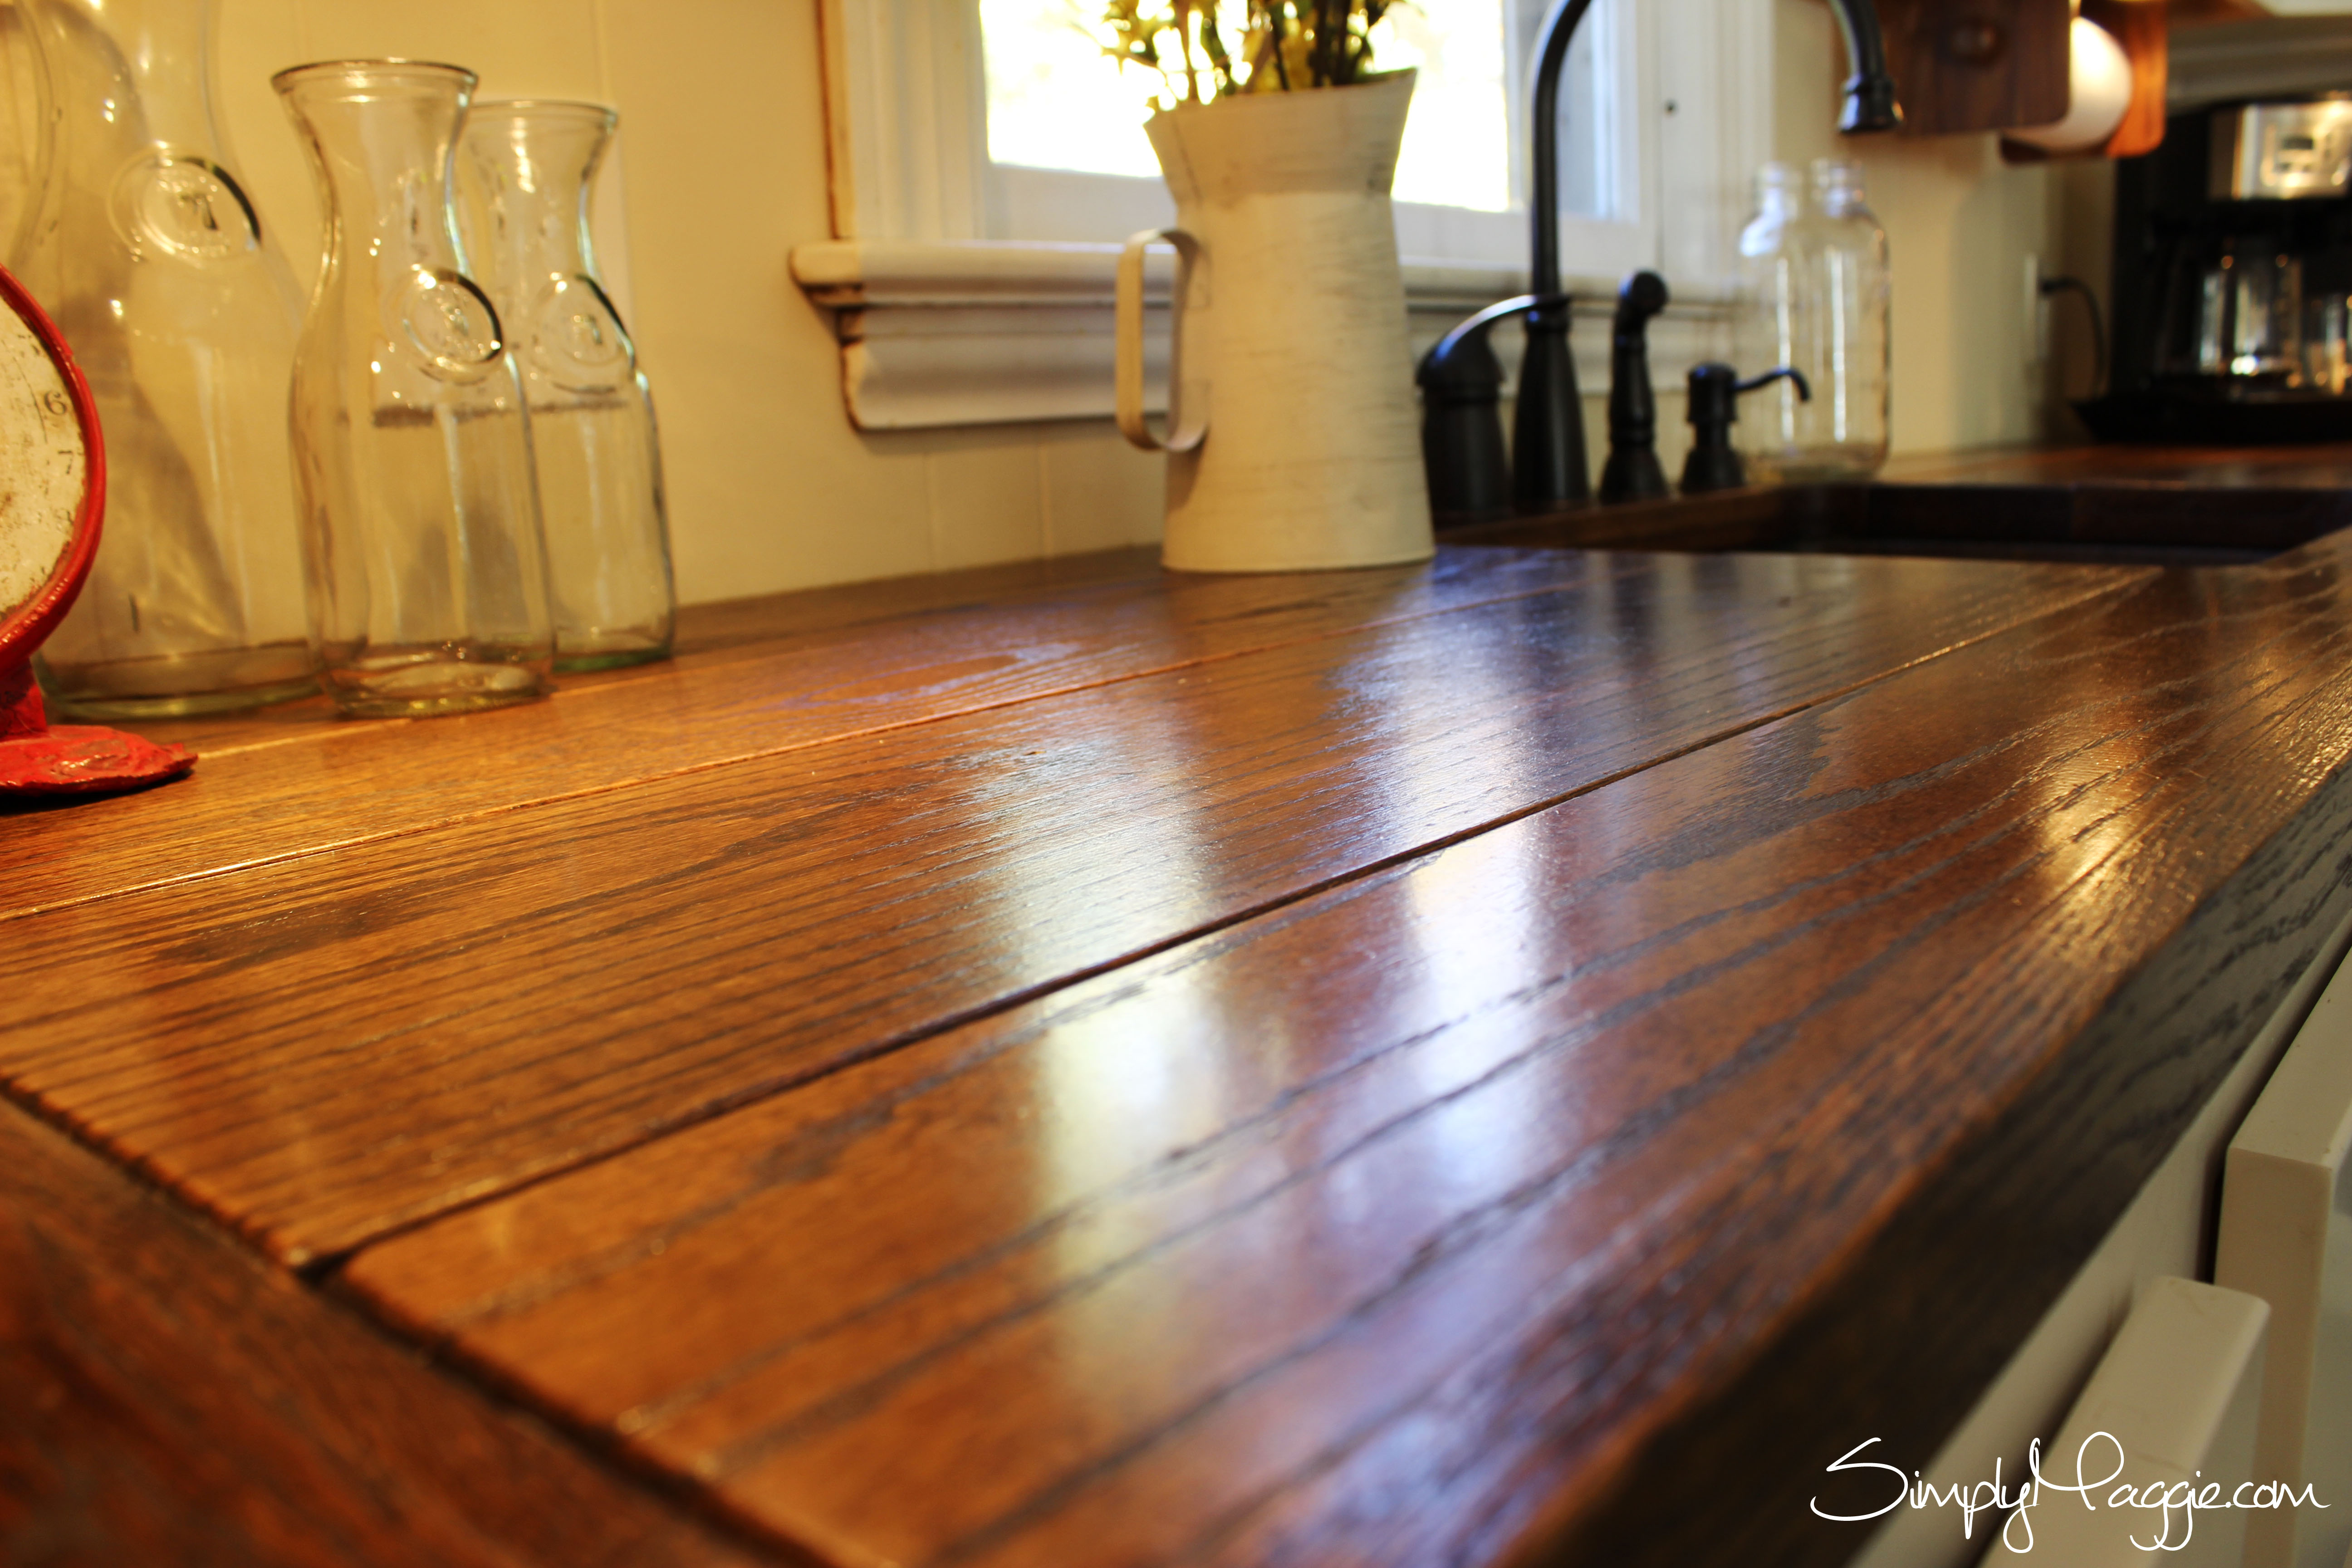
Once you have stained and applied poly to the rest of the counters you’ll need to add a line of silicone to keep it water tight.
And you’re DONE!

Enjoy your custom, hand made, very inexpensive, BEAUTIFUL counter tops! I know I enjoy them every day.
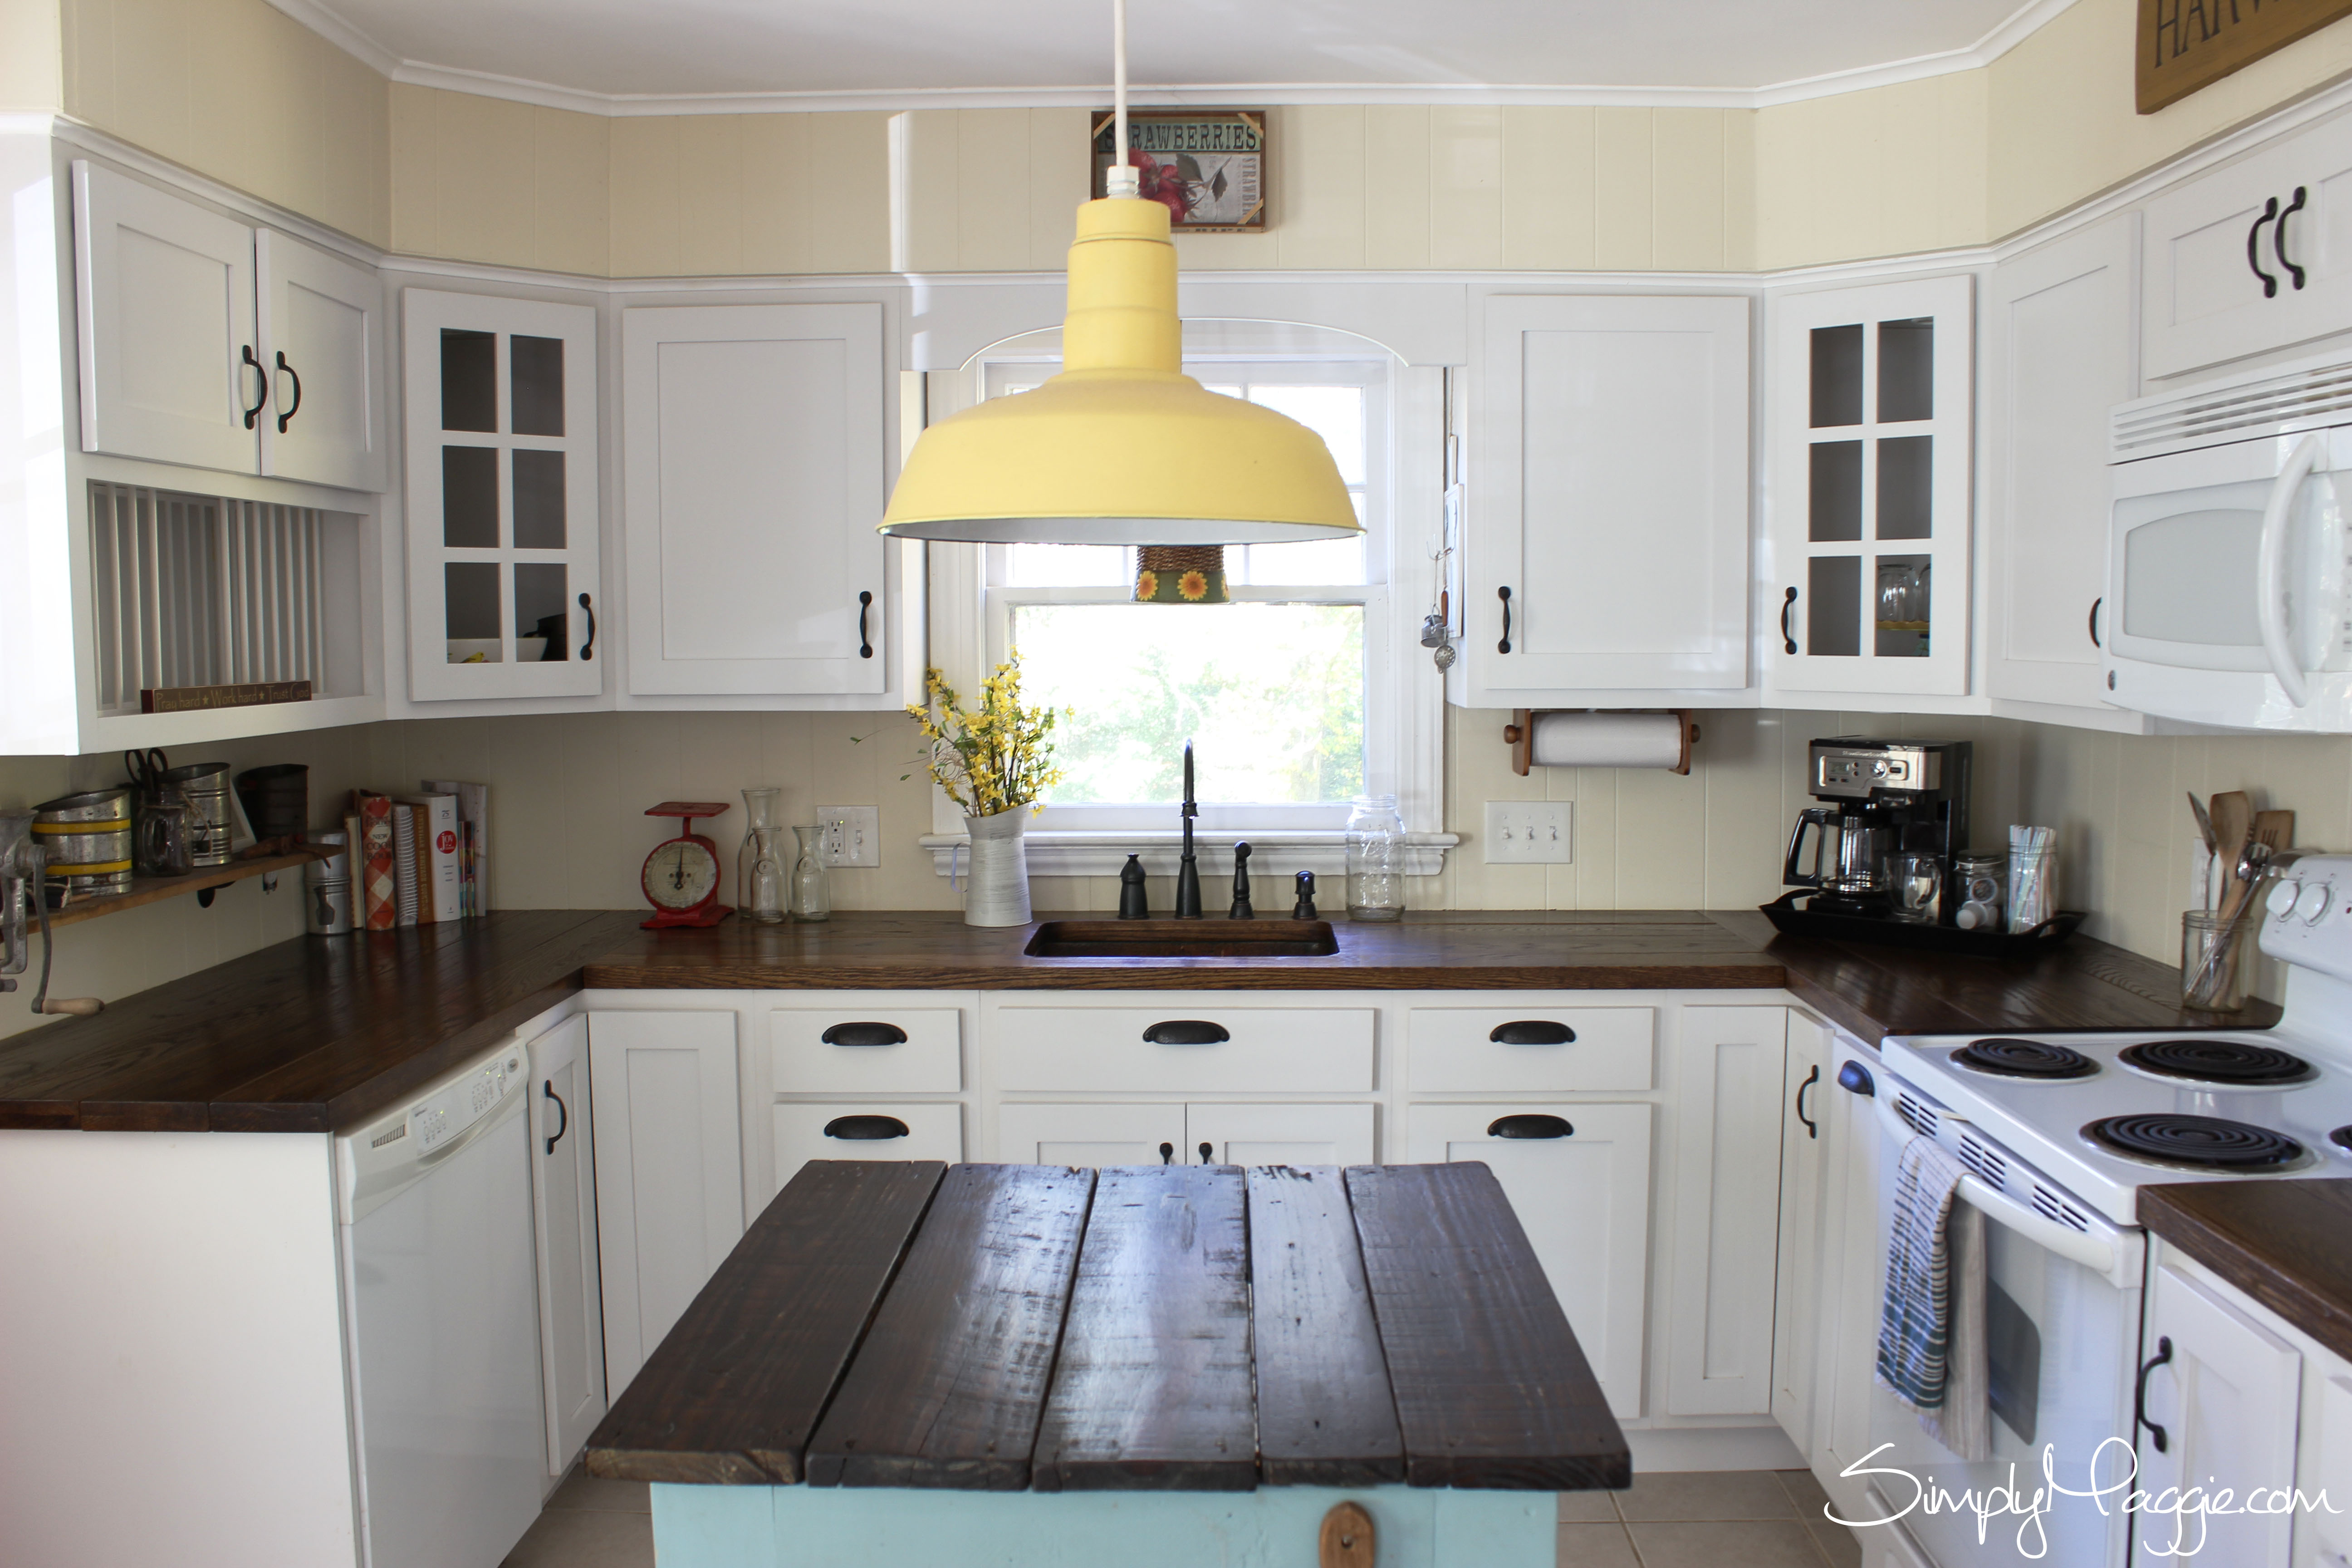


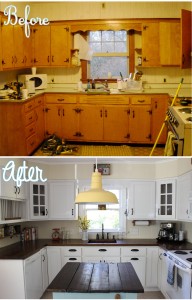
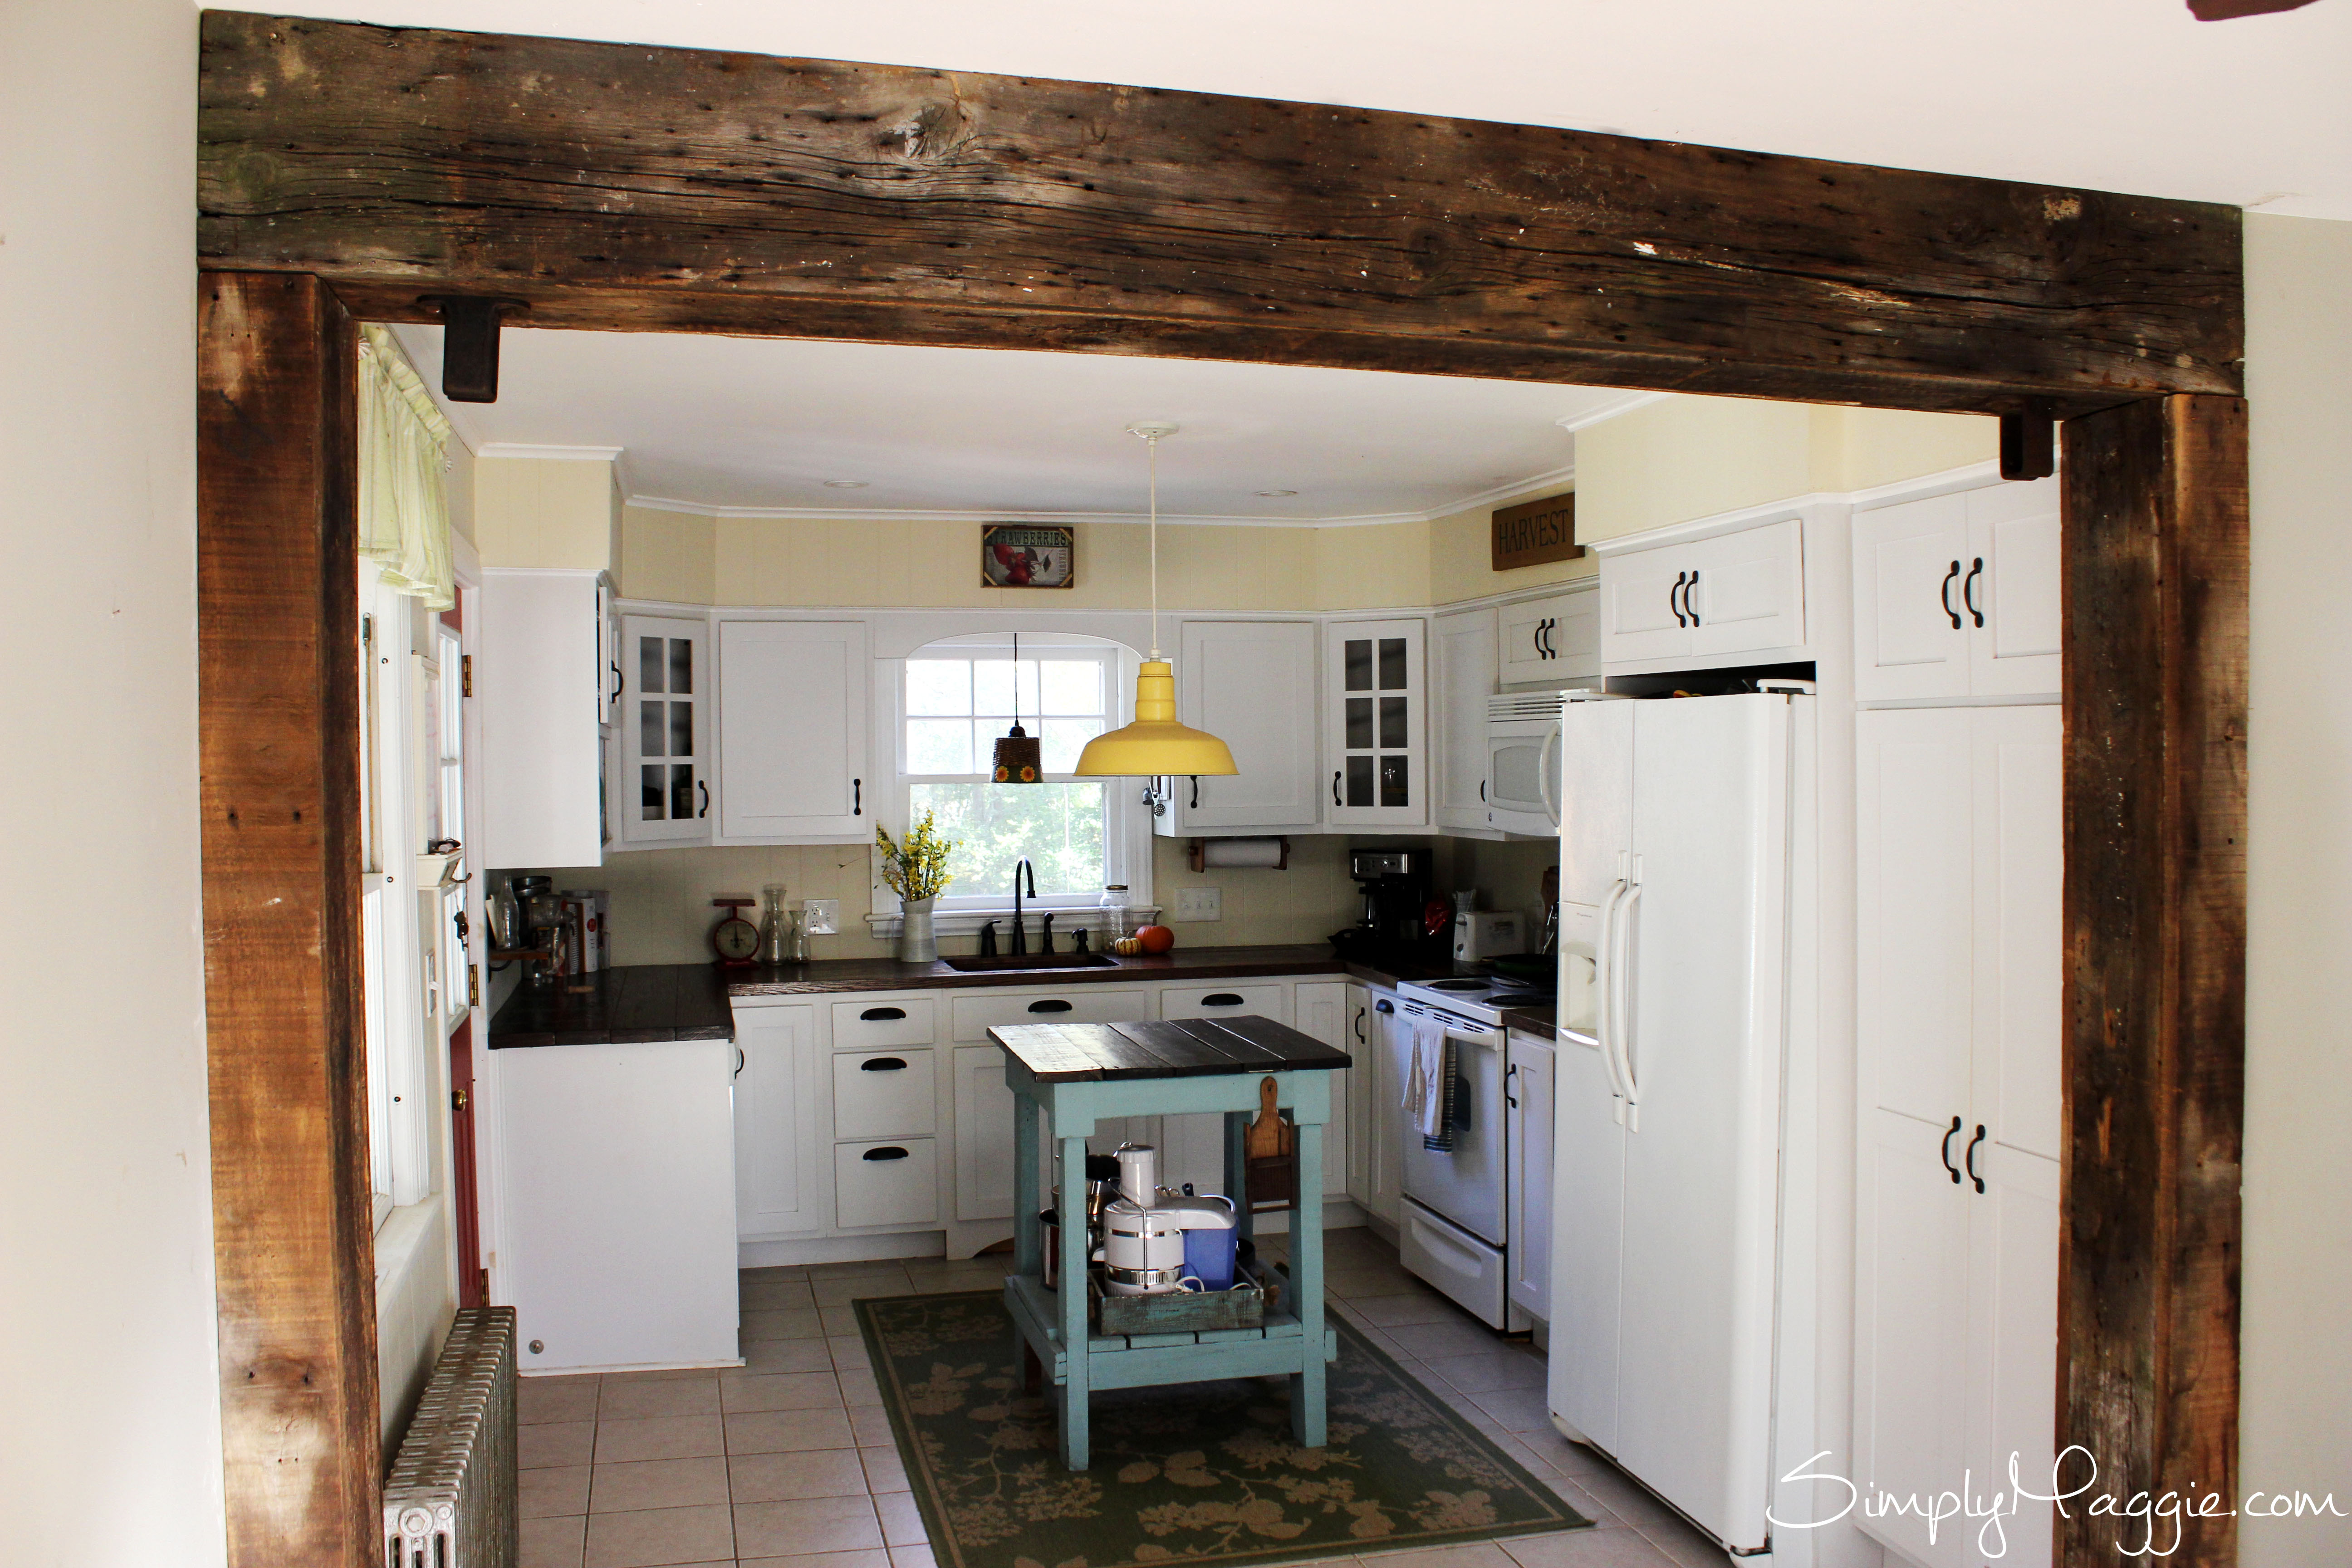
Click the image below to see our complete kitchen renovation.
-Simply Maggie


148 comments
I’d love to try this
This is a counter top for people who don’t cook! It”s beautiful, but there’s no place to set anything hot; grooves are as bad as grout in ceramic tile counter tops that harbor botulism and other germs we try to keep from our families. There’s a reason professional kitchens have solid surface counter tops…they’re easier to keep clean and sanitary, and safer for food handling. If you just like the looks, don’t mind having to refinish them periodically, and don’t care about cleanliness, go for it!
You are talking utter rubbish. Another know it all that knows NOTHING ! These counters are very clean…IF you clean them !! There are sealers that are harmless that can be used to clean them. Dont spread false information rookie. Im a Crapenter and know everything about these. You DONT !
Hi Maggie, I love this post. It’s exactly what I have in mind for my own countertops, so I’ll be following your directions rather closely, so thanks! The one question I have is I’m not sure what you mean when you say, “Double up your oak pieces”. Are you layering 2 pieces on top of each other? If so, you can’t see the seam (i.e two boards on top one another around the sink? Thanks!!
Hello there! Yes doubling your oak pieces means laying one on top of another. And not seeing the seam is a compliment!! haha. We worked very hard to sand that seam away. But yes, there is a seam there and also on the edge on the end of the counter as well.
This is an old post, I hope you still reply? But my kitchen has an end countertop the same as yours and I am following your instructions. 1) Do you double up the oak for that whole cabinet base or just enough that is visible? 2) Have they held up well? 3) Your island looks different, did you use the same technique? Thank you sooo much!
These are beautiful! I can’t wait to show my husband- although he will probably cringe when he finds out we can DIY! Thank you for sharing and all the hard work you put into a post while you were remodeling.
I love the look but how durable are they? Have you had any problems with water or heat?
They have actually been very durable. No problems so far:) and I haven’t babied them like I thought I would. And you can put a seal around the back of the counter also around the sink if you’re worried about water issues there. They have worked out perfect.
Your counters are perfect. Where did you get the wood?
Hi Maggie- I know you posted this years ago but I LOVE the look and am going to make my this weekend… here is my question: Have they still held up by chance? Also- do you recall which kind/type of poly you used for the finish? Have you had to re-apply it at all? I am thinking I would like to do a hard poly and try to fill in the cracks if possible… who knows though!
Thanks 🙂
did you remove the old counter top first??
We sure did. It was an ugly green laminate.
Do you think instead of plywood this could be attached directly to said counters? We have ugly green laminate as well!
If you don’t mind the extra half inch or so of height I don’t see why not!
Hi Maggie,
Over the years, I have always wanted wooden counter tops. Mine are 32 years old now and I just loved this and your tutorial. Maybe I can get my husband to do this one day. Along with some barn door-looking cabinets too. Would be great. Really love the cabin-look! Thank you for sharing!!!
I love the worn looking edges on the planks, but do you have problems keeping crumbs and dried liquids out of them?
Actually the crumbs do fall into the top of the cracks in between the planks but what I do is take the brush attachment on my dyson and vacuum the crumbs out of the cracks and that’ll fix that! 🙂 Other than that I don’t have a problem with any liquids or moisture.
You can use poly as a leveling agent, so you see the cracks but they are actually sealed.
Very neat!! Is it possible to seal this with a few coats of clear wood seal to avoid crumbs falling into the crack?
We actually used 2 coats of polyurethane over the stain. You may be able to use a sealer in the cracks, might be worth looking into. For now I just vacuum the cracks every couple of weeks. 🙂
Fill in the “cracks” with wood filler before you stain. After they are filled in, lightly sand until smooth and then stain it and then put several coats of poly on it.
I did that-filled the seams with wood filler- and now it won’t take the stain the same as the ready of counters. Any suggestions?
Maggie, Your counters are so pretty. Its been about five years now, how are they holding up? Do you remember if you use satin or gloss poly on them. I want mine to turn out just like yours.
What about water? Would water not affect the wood with time?
Just copied your instructions for a server in the kitchen!!! It looks so awesome thanks for all the great tips!!! Staining it tomorrow:)
I love this idea. Was your sink originally under the counter? I would love to put mine under, but it currently sits on top.
I know you said how to undermount it. I’m just wondering if you can do it with any sink or if it has to be special.
I believe almost any sink can be under mount.
That was a new sink, when we installed our counters we installed the sink as an under mount sink. I’m sure you can do that to yours as well.
GREAT JOB,I WILL DO IT AS THE SAME IN MY HOME,THE IMPORTANT IS THAT LOOKS BEAUTIFUL AND THE PRICE IS GREAT…THANK YOU FOR THE BEAUTIFULL IDEA.LOVE IT….
Hi, I love the look of these counters and really want to make some for our kitchen, when I ask the wood guys they said oak wasn’t food safe. I don’t plan on cutting on the counter, I always use a cutting board. Did anyone tell you that? Is it okay to use if it has a clear coat on it? Any thoughts???
Thanks
I have noticed that of all kinds of insurance, health insurance
coverage is the most controversial because of the conflict between the insurance company’s need to remain making money
and the buyer’s need to have insurance coverage.
Insurance companies’ commission rates on health
and fitness plans have become low, thus some firms
struggle to earn profits. Thanks for the suggestions you discuss through
this web site. http://www.ghorne.com/phpversion.php?a%5B%5D=%3Ca+href%3Dhttp%3A%2F%2Fwww.stilis.be%2Fjapan%2Fvivi01.html%3E_____________+___%3C%2Fa%3E,??? ??</a
You and your husband did such a great job on these countertops! I also love the plumbing fixtures you picked out and the under mount sink. Awesome job!
Amazing job! I originally found your blog to learn how to arm knit… Now I may be doing home renos too lol. Really appreciate your hard work (ps I love your Danes 🙂 )
I’m wondering if instead of completely removing the old countertop, if you could just remove the facial board and add the one bys on top of existing top since it’s already 3/4 me board and then add the 2″ trim to the front as stated.
I am thinking of his same thing… Did you ever do it?
Love this!!! I saw this on Pinterest and tried to follow the link, but Pinterest blocked it and said that it may lead to Spam, Nudity, or other inappropriate stuff. I thought you might want to know.
Hi,
We are working on ours right now! Did you poly the bottom also? How are they holding up? We are debating on going with a pklyurthane vs waterlox?
That’s awesome! I would love to see a picture when they are done if you want to post one on my Simply Maggie fb page. Ours have held up great! And we’ve had a few spills on them and no issues. We pollyed the bottom by the dishwasher but doing the whole countertop on the bottom isn’t a bad idea. I’m not sure how waterlox works but I’d research it first to make sure it doesn’t finish streaky 🙂
Do you remember what brand /finish y’all used?
Do you have any issues with dents or problems with knives? I want to do these but I’m scared I will make scratches. I’m very bad for cutting on the countertops. It will not help that the counter tops remind me of a cutting board.
No issues because it’s red oak which is a very hard and durable wood.
Maggie, we have recently purchased our first home and would like to do this to our counter tops but what I am worried about is the bacteria from raw foods would soak into and stain the would and bacteria would end up making us sick and causing the food we prepare to be bad my question is how do these counter tops keep from doing this?
Wood is antibacterial.
Hi,
Just curious how your countertops are doing after a year or so? We’re thinking about doing this ourselves.
Thanks,
-Adam
Hello! It’s kind of funny, just a few nights ago my husband and I were saying that even a couple years after using the countertops we still absolutely love them! No bad scratches, nothing has shifted, no stains, they are still the same as when we first put them in. One of my favorite projects we have done.
Can I ask how much it cost to re-do your countertops? Im curious how much the wood alone was? Thanks! Beautiful!
Sure, I mention in the first paragraph that it cost us around 500.00 to make ours.
This is fantastic, and just that bit more elegant than simple, everyday butcher block. I am going to do this, with two changes: I am going to stagger the boards at the corners to create a sort of herringbone effect, and also do a slight angle on the top of the trim piece to give it an easier time in blending together the plank and the trim – I am not so good at seamlessly attaching end trim as you are, Maggie!
I planning on doing this as my house project this week. My only concern is if the kids put a wet cup on the cabinet will it leave a ring? Did you have any problems with this over time?
You won’t have any problems with rings. They are extremely durable.
Glad to hear this project went so well and has maintained itself. I’ll be mimicking your efforts shortly. Quick question to which I think I already know the answer….I’m better off putting the dollars into a good hardwood vs a softer wood, right?
Hardwood is definitely the better option. That’s the main reason they have lasted so well.
[…] Source: simplymaggie […]
My question involves the counter with the undermount sink. Did you use a 1×4″ or possibly a 1X6″ doubled up oak piece under the faucet/water handle area? Also in the front of the sink how wide is the 3/4″ plywood under the oak? (If you double up the front side with a 1X2″ oak strip). I’m wondering if I would be better off with 2 pieces of 3/4″ plywood, spliced together with the doubled up oak, rather than one piece that I would have to essentially cut out the sink area. I hope this makes sense?
[…] Find out how we built our counter tops for dirt cheap! […]
Hi, thank you so much for sharing your info – the project is indeed a great success, & I hope you are not tired of answering questions that your great outcome generates!
I’m keen to follow your project instructions for my bathroom vanity redo and wonder if a vessel sink needs additional support?
Is there any information you can give me about that? Would a vessel sink need any extra support or are counter brackets enough?
Thanks if you have any response!
Zenz
I see what looks like a homemade kitchen island… did you make that?
Hi Maggie, thanks for sharing this great example. Could you explain how exactly one can “keep the plywood back a couple of inches and double up on the oak where your sink will be ” ? since the counter is assembled on an intact sheet of plywood and the hole is cut afterwards, how can you keep the plywood back ? thanks !
[…] I “kreg”ed 3 of the 2 x 4’s together to make a depth of around 10 inches. I’m not going to include a tutorial of how to kreg 2 x 4’s together to make a plank style top. There are so many out there: Manhattan Nest, Simply Maggie […]
I love this look…want to try in my own home. My question though…How are they holding up? Have you had any problems with cracking, water damage or damage in general?
No doubt it looks so beautiful, but over the years I believe water would take a toll on it, wouldn’t? And about scratches by knives, etc. How to fix them?
I love seeing these DIY wood countertops. I’m curious about possibly using a bar-top epoxy instead of poly to seal them up. Commercial grade, food safe, glossy or matte depending on your tastes, durable as heck … and though it takes some know-how, probably not all that much more labor intensive than brushing on several coats of poly. I’ve had it in the back of my mind for ages for if/when I ever do my own wood countertops, but for some reason on the DIY countertops I am always finding online, nobody ever uses these. Anybody have any ideas why that is? Has anybody ever thought of using or actually used an epoxy coating for their countertops?
Yes! We built our island with hevea wood and used the Marine bar top epoxy. It has held up just fine, no problems with water. It does show fine scratches all over, but they really aren’t that noticable unless you look sideways with the light hitting them. My only problem with them was when my in-laws turned over one of those red liquid-filled fruit fly traps on the top level of the island, leaving a permanent red stain in the epoxy. You can’t put hot or really even warm items on them without leaving marks. It is also extremely messy to apply but if you prep the area well enough it’s not a problem. Oh, the most annoying part of doing the epoxy is the temperature HAS to stay above 75 degrees the whole time it is curing, I think it was 3 days. I was burning up, LOL. Another point to consider if you go the epoxy route is that once it’s on that wood, it ain’t coming off. And it’s not a simple process to sand down and reflood with more epoxy. We actually just bought solid maple countertops and are going to replace this island and the rest of the counters in our kitchen…this time I’m going with good old helmsman spar urethane, water based. I’ve been reading for about a month trying to decide between waterlox, arm r seal, wipe on poly…I’m staining them a light gray first so we will see how they turn out. Hope this helps.
Nice overall look, however, as a professional woodworker I would be concerned gluing solid 3/4″ thick Red Oak boards to plywood. One of the “rules” of woodworking is that solid wood expands and contracts with changes in humidity. If one does not allow for this movement, one will most likely end up with cracks and or checks in the solid wood surface.
Rather than face gluing the boards to plywood, I’d suggest edge gluing the solid Oak boards together to obtain the appropriate counter width,and then putting 3/4″ spacer strips under the solid oak to achieve the 1 1/2″ desired thickness. The 3/4″ X 1 1/2″ solid Oak edge would still be applied.
Additional suggestion: use Titebond # 2 or Titebond 3 glue for water resistance.
Hi John,
How would the oak boards then be applied to the plywood? If you need to allot for expansion wouldn’t gluing them or screwing them down prohibit that? I can’t imagine they’d just be floating overtop. Do you just glue or screw one edge?
He is using 3/4”spacer strips instead of gluing to plywood
I agree … I build stair treads and solid large landings by edge gluing usually 8/4 or 6/4 solid oak planks . We take raw oak and mill or plane them to the thickness we need ..
However you wouldn’t get the gaps as shown in pictures. It would be a hard smooth surface …
I’ve been looking for this kitchen all my life! I found it! My husband is even excited now to start on our way outdated 1982 kitchen! He’s fabulous with wood working! Thanks for sharing what you did! Will try to take progression photos for you!
Great project!!! We are in the process of mimicking you right meow!!! Any chance you remember what brand stain you used?
Great! We used MinWax stain.
If some one desires expert view concerning running a blog afterward i
suggest him/her to pay a quick visit this blog, Keep up
the good job.
I do trust all of the ideas you have offered for your post.
They’re very convincing and can definitely
work. Still, the posts are very quick for beginners.
Could you please lengthen them a little from subsequent time?
Thanks for the post.
You really make it appear so easy with your presentation but I in finding this matter to be really one thing that I feel I might never understand.
It sort of feels too complex and very huge for me. I am taking
a look ahead in your next publish, I will attempt to get the dangle
of it!
Wow, awesome weblog layout! How lengthy have you ever been running a
blog for? you make blogging look easy. The overall look of
your website is great, as smartly as the content!
I am in fact glad to read this blog posts which consists of
lots of valuable facts, thanks for providing these kinds of statistics.
I just bought all the materials tonight to make this counter top, well two smaller versions of them and it cost me $500.13 so the price quoted above of “around $500” is spot on!
Did you biscuit joint the planks together? Have you had any issues with them warping and the planks no longer being level with each other?
No and No 🙂 They are still looking great!
Hi! Your countertops are amazing and they’ve inspired us to try wood countertops in our kitchen. However, I’m scared of cleaning them and ruining the finish. What kind of cleaner do you use on your countertops for daily cleaning or even big messes?
Hello! Don’t be too picky. I’ve been using regular multi-surface cleaners for the past few years such as Method brand or a Windex. It works fine and the counter tops are holding up great.
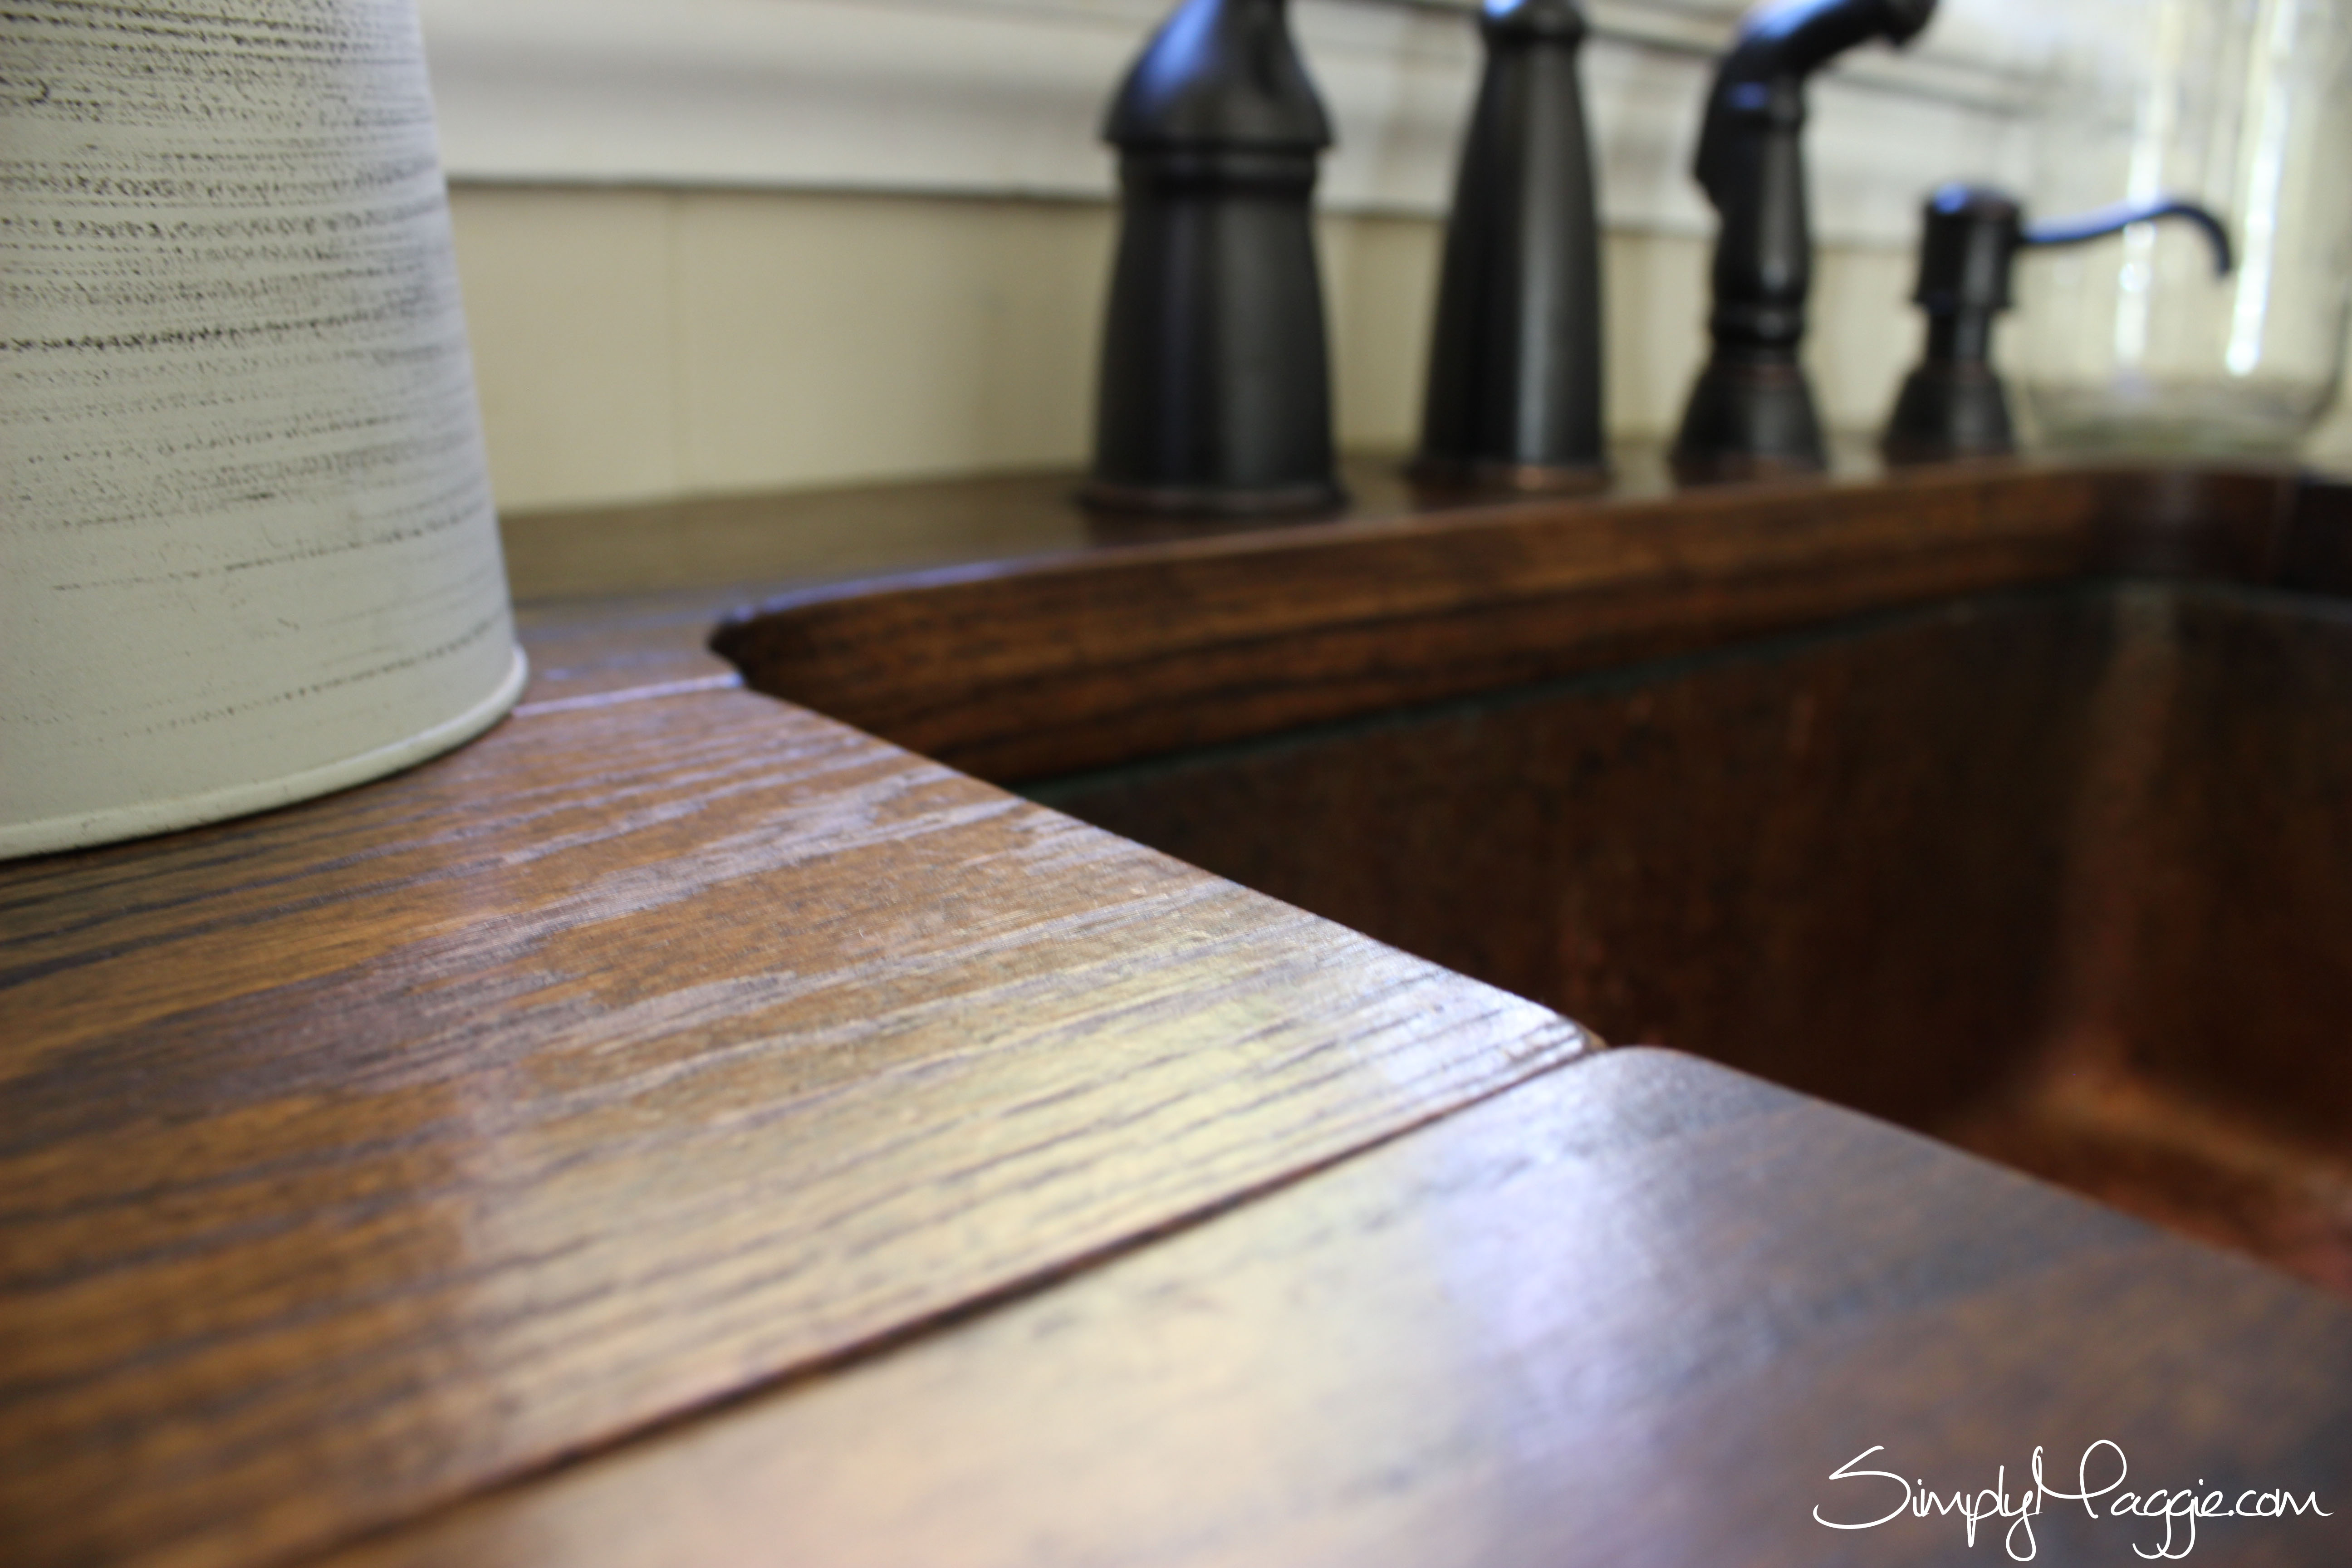
Hey Maggie, this looks fabulous! Just wondering if you needed to let the boards “acclimatize” to your house, and if you did for how long? We have two joints in our countertop too, any chance you will take a close up of the corner and send it to me? I’m not sure exactly how you did that w/ the front trim piece. I was beginning to thing I would be stuck w/ my ugly laminate forever! Thanks for the great tutorial!
Hello. We didn’t. We made our counter tops in the Fall so the temperatures were mild and not humid. As far as the corners or joints, we just butted one end up to the other. You can KIND OF see in this photo here from the blog post.
What a great project. It really turned out nicely!
I actually created a product specifically for keeping cutting boards and butcher blocks staying nice and fresh.
Check it out, it’s 100% plant based as opposed to all the mineral oil on the market. goo.gl/6AMcxV
Stephen
How are they holding up after 2 years?
Has the stain darkened over time? What brand was the stain? I am getting ready to stain some butcher block myself!
Lovely kitchen!!
Thanks!
They are holding up great! I haven’t tried to maintain them in any special way and they still look great after using them for a few years. It is Minwax stain. Good luck!
Thank you!
Way to use the internet to help people solve preoblms!
I love these counters! I just finished staining mine, using your post for inspiration. I was wondering what kind of polyurethane you used? Oil or water based?
Thanks!
I believe it’s water based.
Hi Maggie, I’m wanting to do this in our kitchen as well, but I’m unsure what you mean by “double up” the oak die doing an under mount sink? Can you clarify? Thanks!
Hello, We doubled up on the oak around the sink to create the thick butcher block look. Meaning layer two pieces of red oak on top of each other.
Hi Maggie,
I just emailed you about being featured on Remodelaholic, but sometimes my emails get caught in spam filters, so I wanted to leave a comment as well, just in case. Drop me a line at hello@remodelaholic.com please!
Do u have Picts of your precious island ? ?
Hello! You did such an amazing job and I am getting ready to do this in my kitchen as well… the only issue I am coming across is that the longest part of my counter top is 7 inches too long from the typical 8ft board… any advice what to do about this?
Maybe you can head to a local hardware store where they can special order the right size boards for you.
I know it’s been a few years since your post on the kitchen remodel, but I just have to say what a wonderful job you guys did. It’s just lovely!
I would hire you guys in a minute…you should be so proud and I’m glad you are still loving them.
~~Marilyn
Wow!!! You guys did an incredible job transforming the kitchen! How did you remove the hindges off the old cabinets to make them look so new? Or are they entirely new cabinets?
We had to buy new cabinets because of the horrible smell we could not get rid of.
tables are gorgeous.
Hi there!
We are almost done with our kitchen remodel and would like to try this. I was wondering if you used a food safe poly and if you could let me know the details of the one you used. Also we are leaning towards filling the gaps between the boards with wood filler to make clean up easier, any tips or suggestions as far as that goes? Thanks so much for your instructions and beautiful photos! I will post pics of our finished kitchen on your FB page when we are done!
Hi there, a clear silicone will work for filling in gaps also. Good luck!
Thank u for sharing! We are going to attempt this on my daughters countertops, and am confident we can do it, but I am a little confused on the part of doubling the oak planks around the sink to recess the sink. I believe if i could see it i would get it. Could u take a close up picture of the edge in sink and possibly underneath sink that I may understand? Would be greatly appreciated. Thank u.
Any problems with warping of the wood counter tops over the dishwasher area? Or around the sink?
No warping on our coutertops.
Thank you, for the inspiration our counter tops look amazing. So in love with the way they turned out.
Hi, What is your “trim”?
I am looking to make a butcher block countertop for my craft room desk. This is the best tutorial I have found. Thanks!!
Hi’! Where’s the adorable yellow light from ?
Your countertops are beautiful! My husband and I are working on ours now. Question:
How did you join the 2 countertops to make the L joint, because we’re going to have the same setup. Thank you!
It’s an amazing article in support of all the online visitors; they will get benefit
from it I am sure.
Why didn’t u stagger the joints? I have a countertop length of 10′, would it be best to stagger or buy longer boards?
[…] DIY Wide Plank Butcher Block Counter Tops […]
[…] DIY Wide Plank Butcher Block Counter Tops @ Simply […]
[…] diy wood countertop butcher block style how our diy ikea butcher block wood countertops look 2. Diy wide plank butcher block counter tops simply maggie. Step by step instructions on how to build your own wide plank butcher block counter tops on a […]
[…] Diy wood plank countertop. No more dead space! Daniel kanter + diy + kitchen + manhattan. Diy wide plank butcher block counter tops simply maggie. Step by step instructions on how to build your own wide plank butcher block counter home diy […]
I love your countertops! Getting ready to start mine in a couple weeks. I like the look of your cracks but I think I’m going to fill mine. Thanks for the inspiration. ?
What kind of polyurethane did you use? Is it nontoxic?
What a team! Great job… but I was wondering:
If we use an already made counter top which is made of soft wood, then when all the finish is applied, would it not keep it preserved and watertight? Why the soft wood? It will take the stain better, because we want a darker look that will blend in with the rest of the kitchen. Thanks.
Thank you for the inspiration – we took your lead and then did our own thing with an apron front sink and 2×6 planks instead of 1×6 and love it (https://theecofeminist.com/2016/11/19/before-after-our-diy-eco-kitchen-remodel/).
Do you think gray, weathered prego flooring would look good with white kitchen cupboards and a counter top like this!? I can’t decide!?! Please help!
have you had any problems with water spotting? we did this for our bathroom vanity and my daughter got water on the counter tops and there are white spots. What would you recommend us putting on them to prevent the spotting?
ltablen cialis pills
wsingleu buy real cialis online
vfixedj buy lyrica
udreadfuli buy clomid for men online
xeachc http://edviatab.com/ ubluew sildenafil
dsamey http://www.buyviagra24ph.com fnumberz here
Hello, luv the countertops! I’m looking to do the same but am having a hard time finding the lumber for this project, where did you purchase from please?
I am going to be following your instructions for my counter tops i”m redoing this summer. Does the total price you said include all the tools you purchased or is it just for material? (We already own all the tools needed and most of the small material) I am trying to get my budget right before i start.
[…] 12. DIY Wide Planked Butcher Block by Simply Maggie […]
I see many comments and questions about whether or not this counter is food safe and the owner seems to be avoiding the question. That concerns me.
Maggie I have been looking and looking for wood counter tops and I think yours are the best ones. I am not sure about the double up part though, won’t that make them awful thick. I am going to start this project in May or sooner waiting on weather to break before we do anything. I want to paint kitchen first then start on counter tops. Hope mine will look as good as yours does.
Are they still holding up well near the sink, with the water exposure….water spots, etc?
I have read this tutorial several times over the last few years and I still get stuck in the same place. Your directions for doubling up on the oak boards where the sink would go still has me confused. Especially since the order of your tutorial stated the boards are already adhered to the plywood base. How was this accomplished? Did you cut a larger hole in the plywood first, add oak planks into this hole, then attach your top oak planks over the whole thing? I’m trying to figure out how this would keep the bottom set of planks stable enough to cut all the way through both layers without terrible things happening, lol. I know this is an old one, but could you please clarify this step for me?
I love these ideas, thank you for sharing them. I am so going to try this in our laundry room.
Hello
great share.
I consider the great iptv lists are those from Fishbone cccam
I would like to see more posts like this
Thanks
[…] source […]
Absolutely LOVE the countertops, cabinets, etc. I see that you have had a lot of comments and questions…..here is one more (sorry) I noticed that you did not put a backsplash (it looks great without one) Do you regret not putting one? What kind of backsplash would you use if you decided to add one? Also, do you remember the color you used on the cabinets? I originally wanted to do navy on bottom and a lighter color on top, but it is for a really small kitchen and I think maybe I should keep it lighter. Thanks so much! Your kitchen is truly an inspiration!
When we are finally done with remodeling our home from the mid-late 1800’s it will look almost identical as yours. Do you have any videos on Youtube or elsewhere with some of the processes or steps.
We made an island top out of reclaimed wood. It has beautiful character, but it does not line up seemlessly at all. What would you recommend for bigger crevices in the wood and in places between the planks? The island is 8×5.
I believe what you posted made a bunch of sense. However, think on this, what if you
added a little information? I am not suggesting your information isn’t
good., but suppose you added something to possibly get people’s attention? I mean DIY Wide Plank
Butcher Block Counter Tops | SimplyMaggie.com is kinda boring.
You could glance at Yahoo’s home page and watch how they write news headlines to grab viewers to open the
links. You might try adding a video or a related pic or two
to grab readers interested about what you’ve written. Just my opinion, it might make your website a little bit
more interesting.
Did I read correctly, you used silicone between the planks? I was showing this to my wife and she was concerned with food/drink seeping into the spaces. Which Poly do you recommend?
[…] (adsbygoogle = window.adsbygoogle || []).push({}); Best DIY Wooden Countertops from DIY Wide Plank Butcher Block Counter Tops. Source Image: https://www.simplymaggie.com. Visit this site for details: https://www.simplymaggie.com […]
I love these! We would like to do them in our kitchen. The only problem is that red boards only come in 8’ lengths and our counter is 12’ long. Do you think we could stagger the boards? I know it’s been a while since this was posted but I would love anyone’s advice.
[…] Breite Plank Butcher Block Arbeitsplatten […]
[…] worried about kids (or spouses) who might not use a cutting board when they’re supposed to. But butcher block counter tops are actually fairly easy to take care of and they create a rustic look that will never be […]
DIY gifts for valentine’s day that are perfect for the Linux guy in your life, or for those who simply love to touch, sniff, and experiment with electronics. This post aims to document my current DIY computer lover gear and display the adventures I’ve had in buying, setting up, and connecting my DIY gear, with enough (a lot) of photos to show just how much they’ve done for me.
The purpose of this DIY electronics tour is to show you that while it may look like I’m spending my day in front of my PC desk or tinkering with my Arduino, I’m actually nosing around the web and creating tools that might make life easier for my fellow DIYers. I hope my hardware investments have been informative, fun
[…] Easy Butcher Block Countertop Tutorial […]
I have these countertops. I love them! I had my coffee pot sitting on countertop and it has made a white spot . What can I do to fix this?